Introduction of WordPress Dashboard
WordPress Dashboard is one of the most popular platforms for creating and managing websites. Whether you want to create a personal blog, business website, portfolio, news website, or online store, WordPress provides tools that make website management easier.
After installing or setting up WordPress, the first important area you need to understand is the WordPress Dashboard. The Dashboard is the administrative area where you can create content, manage media, customise your website, install plugins, manage users, and configure important settings. This complete beginner’s guide explains the main sections of the WordPress Dashboard and how to use them.
Table of Contents
What is the WordPress Dashboard
The WordPress Dashboard is the administration area of a WordPress website. It is usually the first screen you see after logging in to your website. From the Dashboard, administrators can access different tools for managing the website. WordPress officially describes the Dashboard as the central area where users can access site content and information.
The WordPress Dashboard normally contains a sidebar menu, top toolbar, dashboard widgets, and links to different administrative sections. For example, If your website is your house, the public website is what visitors see, while the WordPress dashboard is like the control room where you manage everything.
How to Log In to the WordPress Dashboard
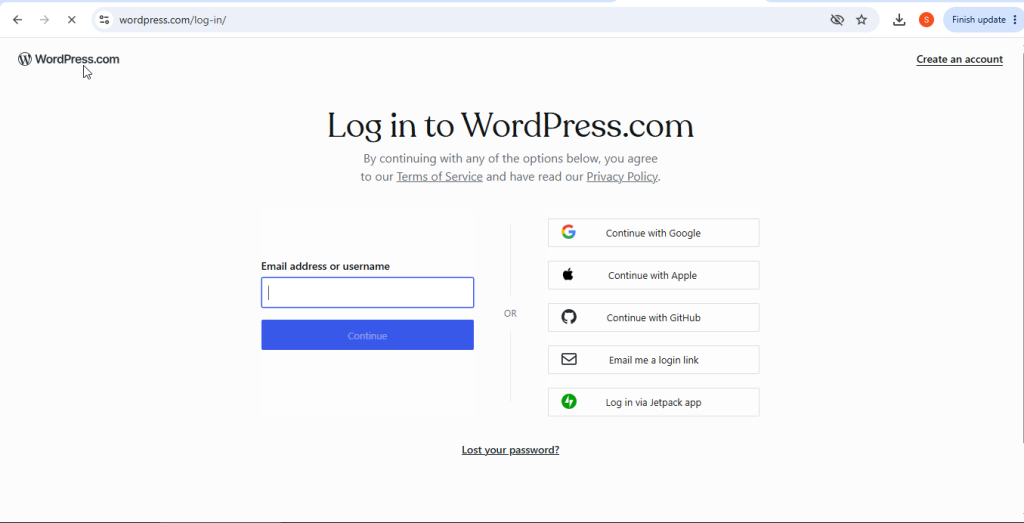
To access your WordPress Dashboard, open your WordPress login page in a web browser. Enter your WordPress username or email address and password. After successful authentication, WordPress takes you to the dashboard. For security, avoid sharing your administrator password with other people and use a strong, unique password.
Understanding the WordPress Dashboard Layout
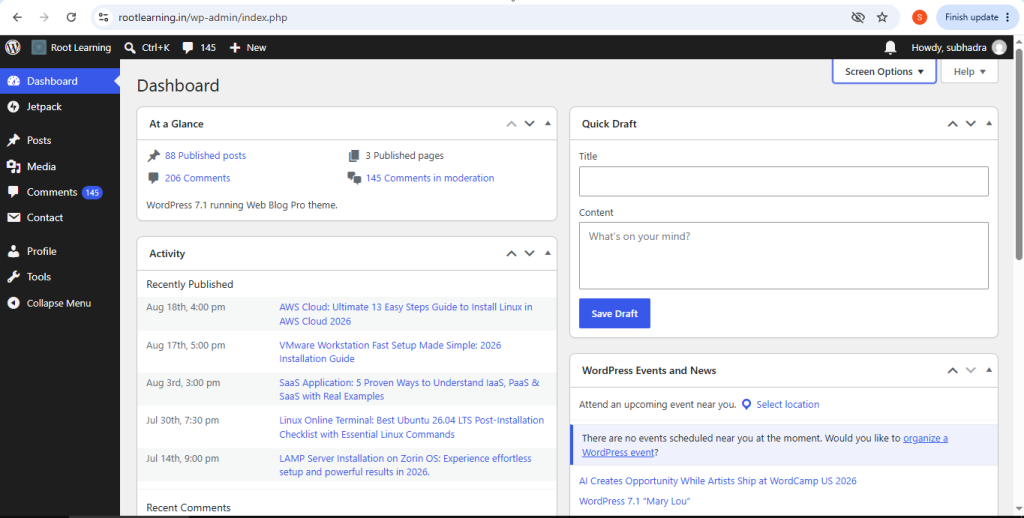
WordPress Dashboard contains several important areas. The exact appearance can vary depending on your WordPress version, theme, plugins, hosting provider, and user permissions. The main areas are:
- Top Toolbar
- Sidebar Navigation Menu
- Dashboard Widgets
- Screen Options
- Help Section
Let”s look at each one
1. Top Toolbar
The top toolbar in WordPress Dashboard appears across the top of the WordPress administration area. It provides quick access to useful functions such as:
- WordPress information
- website name
- Visit Site
- Comments
- New content
- User profile
- Logout options

The New menu can provide shortcuts for creating posts, pages, media, and other content depending on your user role and installed features. You can use the toolbar to quickly move between your website and its administration area on WordPress Dashboard.
2. Sidebar navigation Menu
The left-hand sidebar is one of the most important parts of the WordPress Dashboard. It contains links to major administrative areas.
Dashboard
The WordPress Dashboard menu takes you to the main administration screen. It usually contains useful widget and information about your website.
Posts
The Post section is used to create and manage blog articles.like,
- Create new posts
- Edit existing posts
- Delete posts
- Manage categories
- Manage tags
- View drafts
- Manage published posts
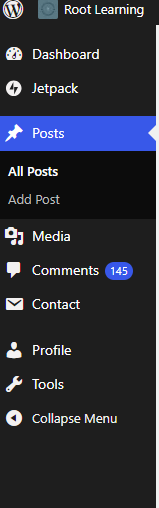
Posts are commonly used for regularly updated content such as blogs, news, tutorials, and announcements.
Media
The Media Library stores files uploaded to WordPress Dashboard. These can include:
- Images
- Videos
- Audio files
- documents
- PDFs
- Other supported media files
You can upload media directly through the media section and later insert those files into posts and pages.
Pages
Pages are generally used for relatively permanent website content. Common examples invlude:
- Home
- About Us
- Contact
- Privacy Policy
- Services
WordPress Dashboard provides a separate Pages section for creating and managing this type of content.
Comments
The Comments section allows website administrators to manage visitor comments. Depending on your settings, you may be able to approve, reply to, edit, mark as spam, or delete comments. Comment management is particularly useful for blogs and website that allows visitors to interact with published content.
Appearance
The Appearance area is used to control parts of your website’s design and navigation. Depending on your theme and WordPress setup, you may find options for:
- Theme
- Editor
- Menus
- Widgets
- Customisation
The available options may vary between themes and WordPress configurations.
Plugins
Plugins add additional functionality to WordPress. For example, plugins can provide features for:
- SEO
- Security
- Contact forms
- website performance
- Backup
- Analytics
- E-commerce
However, beginners should install plugins carefully. Too many unnecessary plugins can make website management more complicated.
Users
the Users section allows administrators to manage accounts that can access the WordPress website. WordPress supports different user roles and capabilities. The permissions available to a user depend on their assigned role. For example, an administrator generally has significantly more control than a contributor.
Tools
The Tools section provides additional utilities for managing WordPress data and website functions. The available tools can vary depending on your WordPress installation and installed plugins.
Settings
The Settings section contains important configuration options for your website. Depending on the installation, you can configure areas such as:
- General settings
- writing
- Reading
- Discussion
- Media
- Permalinks
- Privacy
For Example, Media settings can control certain image sizes and how uploaded files are organised.
3. Dashboard Widgets
The main Dashboard area contains information panels called widgets. WordPress provides several default Dashboard widgets, including:
- At a Glance
- Activity
- Quick Draft
- WordPress Events and News
- welcome
The At a Glance widget provides a quick summary of posts, pages, comments, and other basic site information. The Quick Draft widget allows you to quickly save an idea as a draft post without immediately publishing it. plugins can also add their widgets to the Dashboard.
4. Using Screen Options
Sometime you may open a WordPress Dashboard screen and notice that an option or widget is missing. This is where Screen Options can help. The Screen Options tab
allows you to control which available elements appear on a particular administration screen. You can select or clear check boxes to show or hide specific widgets or columns. For example, if a widget is not visible on the Dashboard, click Screen Options and check whether that widget is enabled. This feature is especially useful for beginners following WordPress tutorials because different Dashboard configurations may display different elements.
5. Using the Help Tab
The Help tab provides information related to the administration screen you are currently viewing. For example, when you are working with posts, pages, or Dashboard settings, the Help section can provide relevant information about that particular screen.
This can be useful when you are learning WordPress and are unsure what a particular option does.
What is the WordPress Block Editor?
The Block editor, also known as Gutenberg, is the standard WordPress editor for creating posts and pages. Instead of placing all content into one large editing field, the block Editor uses individual content blocks. Examples include:
- Paragraph block
- Heading block
- Image block
- List block
- Video block
- Quote block
- Table block
You can add, remove, block, and configure blocks while creating your content.
How to Create a New Blog Post
Creating a post is one of the most common tasks in WordPress. Follow these basic steps:
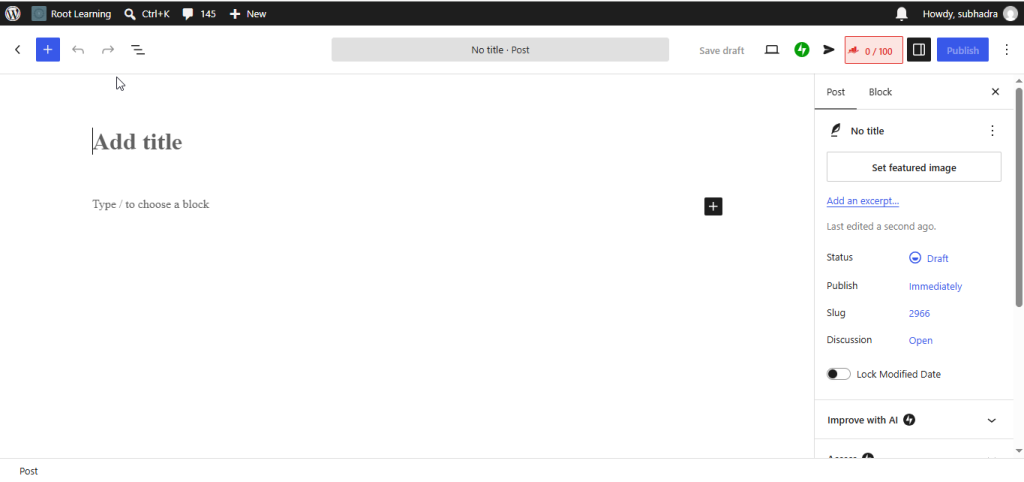
- Log into your WordPress Dashboard.
- Open Posts.
- Select Add New Post. and enter your article title.
- Add your content using blocks.
- Add relevant headings and images.
- Select a category and add tags if required.
- Add a featured image if your website uses one.
- Review the content.
- Preview the post.
- Publish the post when it is ready.
The Block Editor can be opened from Posts–Add New or Pages–Add New
Common WordPress Dashboard Problems
Beginners may encounter a few common problems.
A menu option is missing: Check your user permissions and Screen Options. Plugins and themes can also change what appears in the Dashboard.
A widget is missing: Open Screen Options and check whether the widget is enabled.
The Dashboard looks different: This can happen because of different themes, plugins, WordPress configurations, or user roles.
A plugin causes problems: If an issue appears immediately after installing or updating a plugin, check the plugin’s documentation and compatibility information before making further changes.
Conclusion
The WordPress Dashboard is the central control area for managing a WordPress website. Once you understand the sidebar, toolbar, Dashboard widgets, Posts, Pages, Media, Plugins, Users, Appearance, Tools, and Settings, managing a website becomes much easier. For beginners, the best approach is to learn one section at a time.
Start by creating a simple post, uploading an image, creating a page, and exploring the available settings. As you become more comfortable, you can learn about themes, plugins, SEO, security, performance, and advanced WordPress management. Understanding the Dashboard is an important first step toward becoming confident with WordPress and creating well-structured websites.
Frequently Asked Questions (FAQs)
Q. What is WordPress Dashboard?
The WordPress Dashboard is the administrative area where you can manage your website. you can create posts and pages, upload media, manage plugins, change settings, and perform other website management task.
Q. How do i access the WordPress Dashboard?
You have access it by adding /wp-admin to your website address, such as http://yourwebsite.com/wp-admin. You then need to login with your WordPress credentials.
Q. What can i do from the WordPress Dashboard?
You can create and edit posts and pages, upload images, manage comments, install plugins, customise your website, manage users, and configure website settings.
Discover more from Root Learning
Subscribe to get the latest posts sent to your email.


One thought on “WordPress Dashboard: Amazing WordPress Dashboard Features Every Beginner Should Know in 2026”