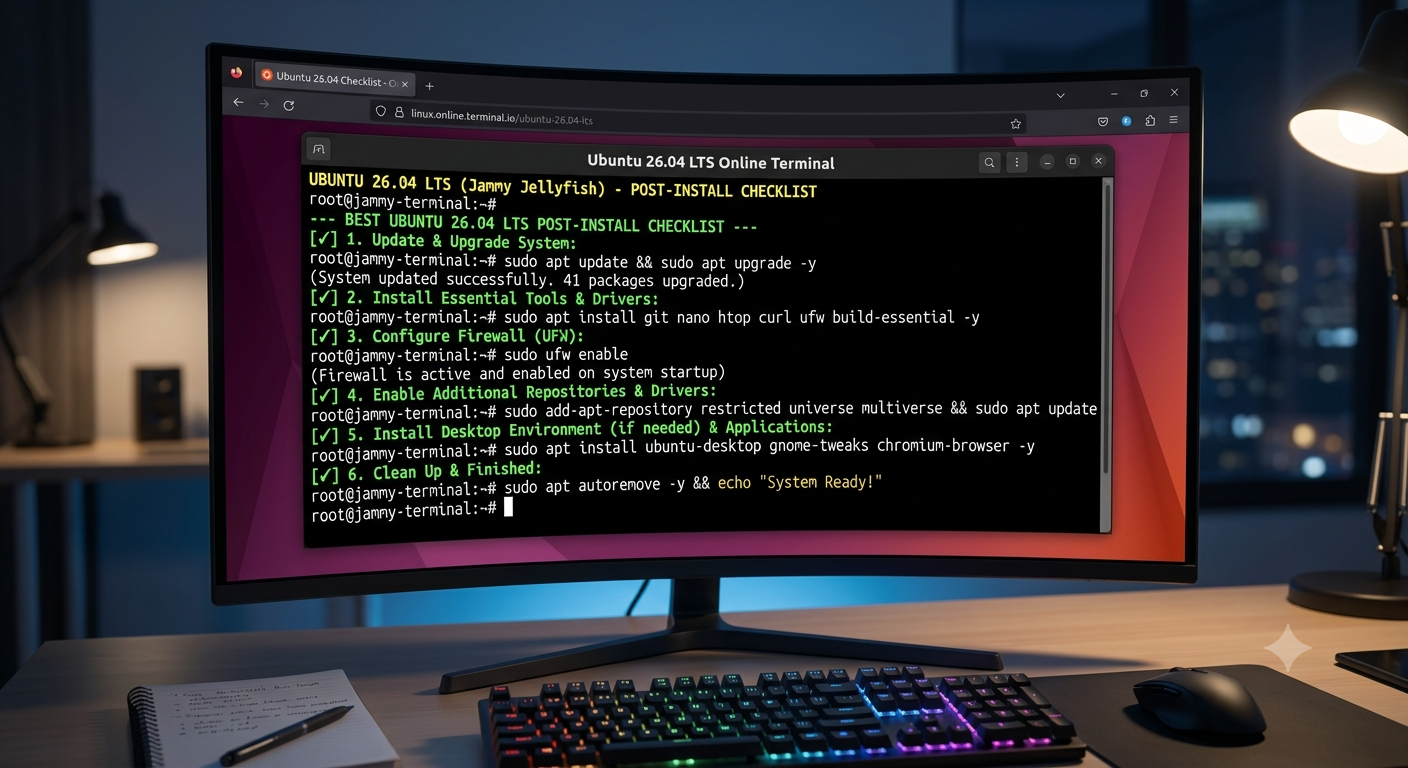
Linux Online Terminal is one of the best platforms to experience Ubuntu 26.04 LTS before installing the system on a local computer. Whether one just installed a new Ubuntu or is just practicing in Linux Online Terminal, in each case, every Linux newbie faces the same problem. The Linux OS was installed, and the Linux desktop environment is being shown on the screen. What should one do next? This and other similar questions are resolved with the help of post-installation configuration and several essential Linux terminal commands that will help set up the Linux system correctly and securely.
This is where newbies to the system either get lost and fail to configure it correctly, or they get their hopes up and subsequently smash something within the hour. This guidebook aims to straddle the fence; it provides a useful post-installation checklist for Ubuntu 26.04 LTS “Resolute Raccoon”, coupled with a set of basic Linux commands used in everyday operations. If you are a newbie to the Linux operating system, you may want to try out each of the commands below using a Linux Online Terminal emulator in your browser before you attempt any of them on a real computer.
Table of Contents
Why Ubuntu 26.04 LTS Is Worth Setting Up Properly
Ubuntu Linux 26.04 LTS, a major update that debuted in April 2026, provides the Linux 7.0 kernel, GNOME 50, desktop session, and a session based solely on the Wayland compositor (removed the login screen option for the legacy X11 session), and full-disk encryption with hardware security modules (TPM). Also, for the first time ever, some of the standard command-line utilities will be re-written in the memory-safe language Rust to increase stability, and native support for AI/ML development stacks such as NVIDIA CUDA and AMD ROCm is available.
Due to the memory overhead of the more recent GNOME 50 desktop and the new Wayland compositor, the optimum amount of desktop memory has been raised from 4 to 6 gigabytes between Ubuntu 24.04 and Ubuntu 26.04.This is an important consideration if you plan on running Ubuntu Linux 26.04 LTS in a virtual machine or on lower-end hardware. A good alternative to test-drive Ubuntu Linux 26.04 LTS without breaking your actual computer is to use a Linux online terminal which does not require any plugins or software to be installed on your local machine.
With five years of free security updates (through April 2031, extendable further with Ubuntu Pro), this is a release built to be lived in for a while. That in and of itself justifies spending twenty minutes ensuring that you’ve done it correctly rather than simply launching the installer and continuing.
Step 1: Verify What You’re Running
Make sure your system was set up as you intended before proceeding. In the Linux online terminal, type the following command:
hostnamectlYour hostname, the precise OS version, and your kernel build are all revealed by this one command.
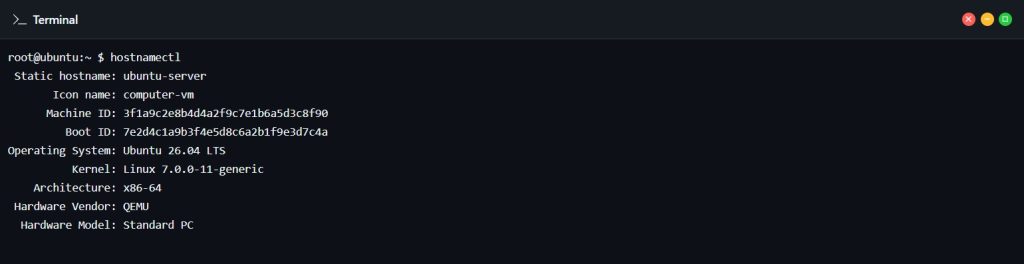
You probably want to see something like “Ubuntu 26.04 LTS” and a kernel version starting with 7.0. Also, this is an incredibly handy thing to know in general – if you ever need assistance, “what does hostnamectl say?” (or alternatively, “uname -a”) will be one of the first things someone will ask.
Step 2: Update and Upgrade Immediately
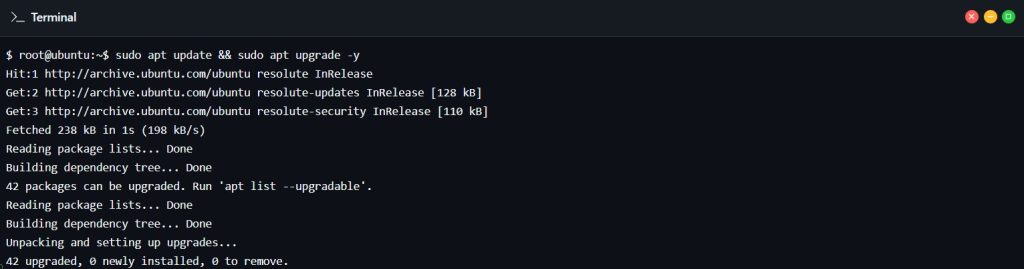
This is always one of the top priorities. This applies to whichever linux os you chose; a fresh installation can have several weeks, or even years, of updates waiting for you. To update your system run the following command in the Linux online terminal:
sudo apt update && sudo apt upgrade -yIn order for your system to know which versions are the most recent, this first updates your local list of available packages and their versions. After that, your system is actually upgraded. The “&&” indicates that the second command won’t execute if the first one fails. In either case, the output ought to resemble this:
After running these commands in the Linux online terminal, it’s a good idea to do the following:
sudo apt autoremove -yThis will remove any unneeded packages, such as old kernel versions.
Step 3: Set Up Your Firewall
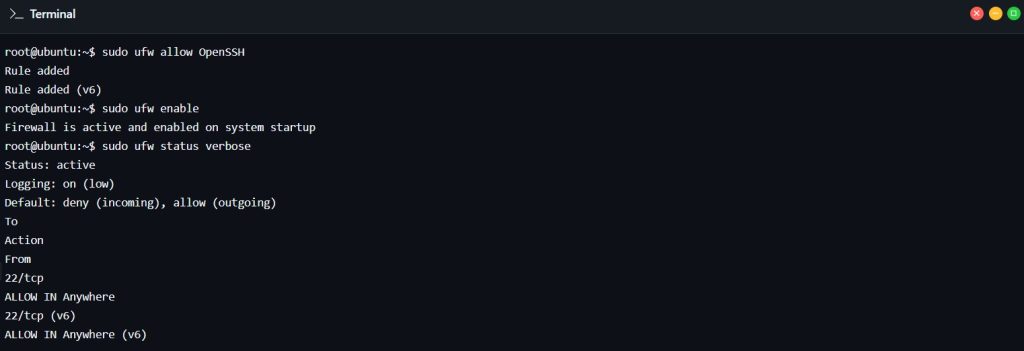
The default firewall that comes with Ubuntu is ufw. It is disabled by default, but it’s always a good idea to enable it anyway if your system is going to be exposed to a network (whether that be a home wireless network or a cloud vps provider):
sudo ufw allow OpenSSH

sudo ufw enable

sudo ufw status verbose
Notice that the SSH rule is added before enabling the firewall. If you’re connected remotely and skip that step, you can lock yourself out of your own server; a mistake almost every sysadmin has made at least once.
Step 4: Examine Memory and Disk Space
After installation, it’s worth doing a short sanity check to determine exactly what you’re working with because Ubuntu 26.04 has increased hardware requirements. Run the following commands in the Linux Online Terminal:
df -h

free -h‘df -h‘ displays the amount of disk space used in a more human-friendly manner (shows gigabytes, not number of blocks). Similarly, free -h displays the amount of RAM and swap (virtual) memory available in a more human-friendly manner.
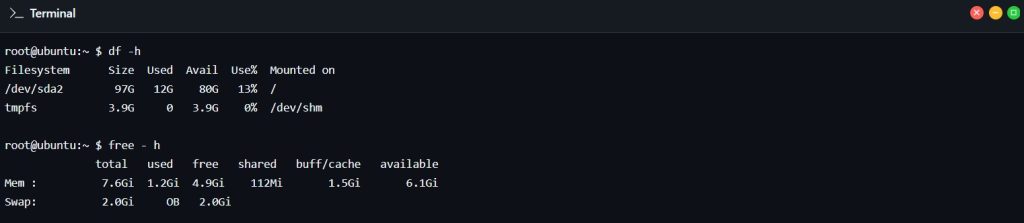
If, as shown in the output above, you see that swap is turned off (the line with swap says 0), or it is much smaller than your RAM (a swap partition of 6GB is advised minimum for a server with a lot of RAM), create a swap file, which will allow your system to continue functioning even when you are out of RAM. You probably need to set up the swap file no matter what, if you are low on RAM.
Step 5: Creating a Non-Root User (If you do not have one)
If you installed a fresh server or a VPS, chances are that you only have one user, which probably has root privileges. Working as root full-time is a bad habit. One typo in a `rm -rf` command as root can wipe out far more than intended. Set up a dedicated user instead:
adduser yourname

usermod -aG sudo yourname
The first command creates the account and guides you through setting a password; the second one adds the user to the ‘sudo’ group, giving them administrative privileges needed to perform tasks that require root-level access, but without actually logging in as root all the time.
Step 6: Installing the Essential Packages
As mentioned, a minimal install of Ubuntu has almost nothing on it. You might even say it has literally nothing on it. So, to make your life a bit easier, below are some of the most commonly installed programs during the first hour of using Ubuntu:
sudo apt install build-essential curl wget git vim htop unzip -yBelow is the list and brief description of what each mentioned package provides:
build-essential – a collection of packages needed to compile other packages from source code
curl and wget – command line tools for transferring data from or to a web server, for testing API calls or webhooks, etc.
git – a version control system, essential for almost any programming or writing task
vim – a highly customizable text editor designed for productivity and often utilized for writing code, though nano is also an option if you prefer something less intense
htop – an advanced task manager that provides a detailed view of all processes in a nice terminal-based interface
unzip – because you will, eventually, need to unzip something
Step 7: Setting Your Timezone and Locale
For logs, cron jobs, and anything timestamp-related, this tiny bit of detail is crucial:
timedatectl list-timezones

sudo timedatectl set-timezone Region/City
At this point substitute your region and city, such as America/New York or Europe/London, for Region/City. Run timedatectl without providing any arguments to verify that it has already been applied.
Step 8: Enable Automatic Security Updates (Optional but Recommended)
Ubuntu is capable of handling security patches automatically in the background if you would prefer not to manually run ‘apt upgrade’ every week:
sudo apt install unattended-upgrades -y

sudo dpkg-reconfigure --priority=low unattended-upgrades
It’s a good idea to have automatic security updates for any server that is publicly accessible on the internet as a failsafe. This closes the window between when a vulnerability is reported and when it is patched on your system.
Cheat Sheet For Linux Commands
After completing the aforementioned checklist, the remainder of your Ubuntu experience will depend on you becoming proficient with a basic set of Linux commands in the Linux Online Terminal. Here is a useful resource arranged according to your actual goals:
Using the filesystem
pwd – diplays the current directory
ls -la – list all entries including hidden files and folders
cd foldername – change directory (write the name of the directory or path after the command, or cd.. to navigate back)
Working with files
cp file1 file2 – used for copying a file
-mv file1 newname – used for moving or renaming a file
rm filename – used for deleting a file (`rm -r foldername` for a whole directory)
mkdir foldername – creates a new directory
touch filename – creates an empty file
Reading and editing
cat filename – used for printing a file’s contents to the screen
less filename – used for viewing a file page by page (press `q` to quit)
nano filename or vim filename – used for editing a file directly in the terminal
Permissions and ownership
chmod +x filename – used for making a file executable
chown user:group filename – used for changing who owns a file
Processes and system monitoring
ps aux – used for listing all running processes
htop – used for interactive process viewer
kill PID – used to stop a process by its process ID
Searching
grep “text” filename – used for searching for text inside a file
find / -name “filename” – used for searching the whole filesystem for a file by name
Networking
ip a – displays the network interfaces and IP addresses
ping google.com – used to test connectivity to a server
curl -I example.com – checks response headers from a website
If you’re just starting out, a Linux Online Terminal is actually a really good way to do it. You can try out any of the commands in this cheat sheet in an easily accessible, browser-based sandbox and make mistakes without worrying about wrecking anything.
Why It Makes Sense to Practice on a Linux Online Terminal
A lot of people assume you need a dedicated machine, a virtual machine, or a spare partition to actually learn Linux. That’s not true anymore. That’s not how it works anymore. A linux online terminal can give you a fully fledged shell within a browser for specific usecases like:
– You want to test the commands in the Linux online terminal before running them on your actual Ubuntu 26.04 install
– You’re learning the linux operating system for the first time and don’t want to risk your main computer
– You need quick access to a Linux online terminal from a Chromebook, tablet, or a computer where you can’t install anything
– You’re teaching someone else and want them to follow along without a lengthy setup process
Linux online terminal won’t be a permanent replacement for a full install ever, since you’ll eventually need more than just the command line that a regular install or even a VM would give you. But, as a means to ease into the command line before or after your Ubuntu 26.04 install it’s pretty much perfect.
Final Thoughts
Getting Ubuntu 26.04 LTS installed is only the beginning. Following all the steps above; from updating your software and securing the firewall to setting up your user account and installing the tools you need to work with on a daily basis; should take no more than half an hour. This will save you hours of headaches in the future. Combined with the knowledge of essential Linux commands covered in this article, being able to navigate this beginner’s guide to Ubuntu Linux or practice your skills in a Linux online terminal will prepare you to work confidently with Ubuntu than you were before you started.
Screenshots in this article are from the Ubuntu Linux online terminal, displaying command output, and may vary in package counts, IP addresses, and other information depending on your own system.
FAQs
What is the very first thing I should do after installing Ubuntu 26.04 LTS?
You need to first run the command sudo apt update && sudo apt upgrade -y. Even though you downloaded the system a few months ago, the installation media can still be out-of-date. It is crucial to follow this step for every Linux distribution and cannot be skipped.
How much RAM does the new Ubuntu 26.04 LTS require?
The minimum memory requirement is now 6 GB instead of 4 GB. The reason for this change was Gnome 50 and Wayland compositor, which is heavier than the X11 version. So, if you are using old computer hardware or a light virtual machine, this might not be the best OS for you. It is a good idea to check how much memory your Ubuntu has with a free -h command in the Linux online terminal in case you do not have enough RAM.
What is a Linux Online Terminal, and why do I need one?
A Linux online terminal emulator interfaces with a web browser making it simple for you to run Linux commands. You can use it in lieu of a local Linux shell. In this case, the local command prompt cannot be replaced by an online terminal emulator since we will run it on a remote host. However, a web-based shell is perfect for testing potential commands. You might also use Linux Online Terminal as a learning tool since it does not require any additional software.
How do I enable the firewall on Ubuntu?
The firewall is disabled by default, but Ubuntu comes with ufw software. You need to allow OpenSSH first before enabling a firewall with sudo ufw allow OpenSSH command. Next step is turning it on with sudo ufw enable command. The last thing to do is check everything you set up using the command: sudo ufw status verbose. One thing to note is that you should allow SSH before you turn the firewall on, or else you will not be able to log into the system remotely.
What are some Linux commands I should memorize as a beginner?
You need to remember some of the most common commands such as pwd, ls -la, and cd for working with the file system. Then there are cp, mv, rm commands for copying, moving, and deleting files and directories. Finally, you need to learn how to use the software with sudo apt update, upgrade, install, remove commands and check the disk space with df -h and memory with free -h commands. After mastering these commands, it will be easier to work with more complex operations like grep, htop, chmod, and many others.
Discover more from Root Learning
Subscribe to get the latest posts sent to your email.