Learn a step-by-step guide to creating the email server for your business.
Take full control of your communications, privacy, and professional image.
Setting up your own email server ensures secure communication, sensitive data protection, and client trust.
This guide will walk you through every step to create a private and professional email system.
Table of Contents
Introduction: Why Creating an Email Server Matters
Owning your email server gives you full control and professionalism.
Many small businesses rely on Gmail, Outlook, or Zoho because they are easy to use.
But using third-party servers means limited privacy and less brand authority.
Creating the email server allows you to send emails like hello@yourbusiness.com.
This looks professional and gives your clients more trust.
For example, a small IT startup ensured secure client communication by hosting its own server.

Benefits of Creating an Email Server
As soon as you start creating the email server, you will see how many benefits it offers in the long run:
- Privacy First: Third-party systems can’t catch your messages.
- Brand Authority: A unique company domain gives the impression of reliability.
- Full Control: You are the one who determines the rules for spam, filters, and storage capacity.
- Data Security: Your data is safe with SSL and authentication.
- Scalability: Make new accounts with ease as your team grows.
- Cost-Effective: A monthly subscription for every user is not required.
- Compliance: Perfect for companies that process sensitive information (GDPR, HIPAA, etc.).
Prerequisites Before Creating the Email Server
Ensure you have a few prerequisites ready before you begin building the email server:
- Domain Name: e.g., yourbusiness.com.
- VPS or Dedicated Server: AWS, DigitalOcean, or Hostinger recommended.
- Operating System: Linux (Ubuntu or Debian).
- Static IP Address: Ensures smooth DNS and delivery.
- SSL Certificate: Use free Let’s Encrypt.
- Basic Linux Knowledge: Terminal commands help save time.
Step-by-Step Guide to Creating the Email Server
Now for the easy DIY part: how to actually begin setting up your company’s email server.
Step 1: Prepare Your Server
Get a VPS with at least 2GB RAM and 30GB storage. Then, update your system:
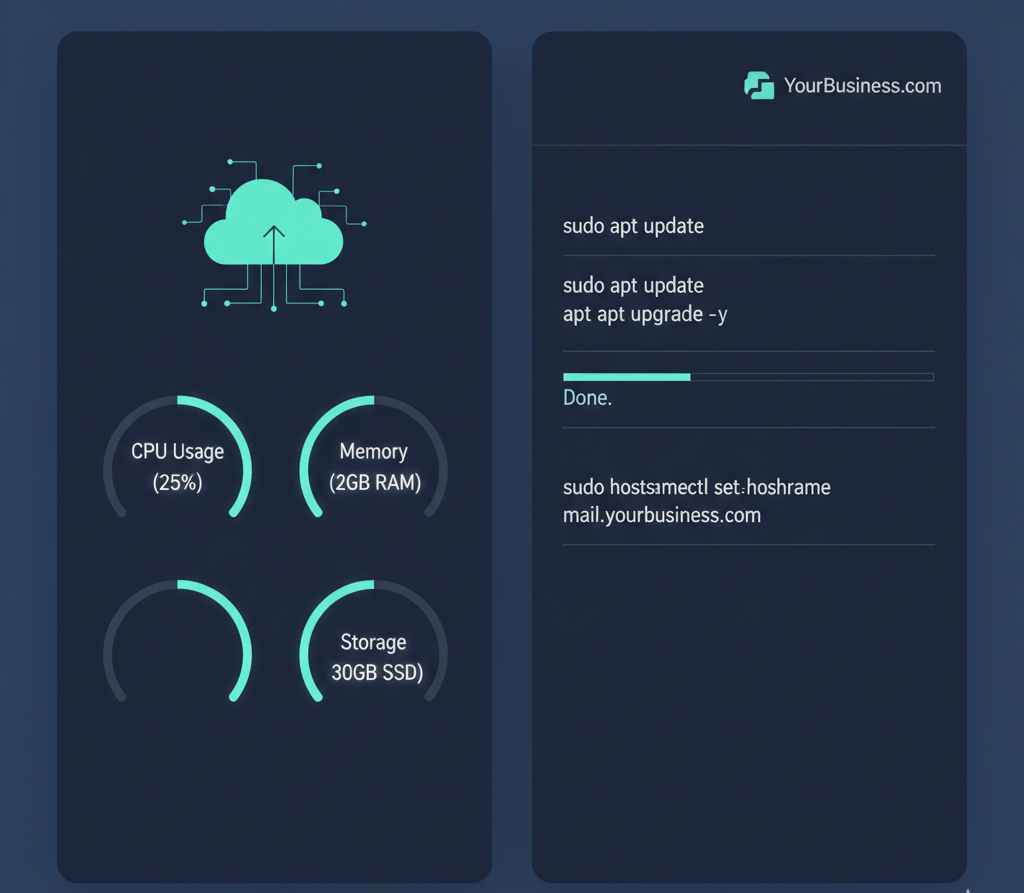
“sudo apt update && sudo apt upgrade -y”
Next, set your hostname:
“sudo hostnamectl set-hostname ”
Step 2: Configure DNS Records
Your DNS setup ensures that other servers can locate your mail system.
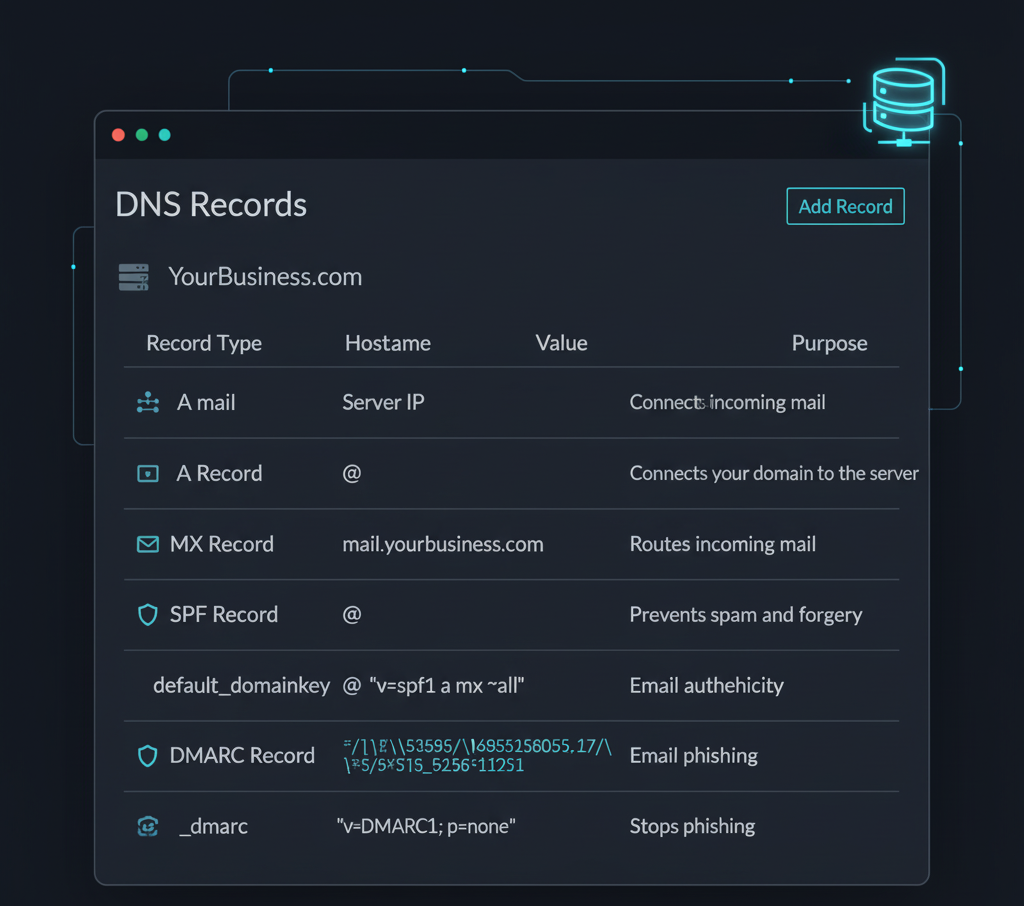
| Record Type | Hostname | Value | Purpose |
| A Record | Server IP | Connects your domain to the server | |
| MX Record | @ | mail.yourbusiness.com | Routes incoming mail |
| SPF Record | @ | “v=spf1 a mx ~all” | Prevents spam and forgery |
| DKIM Record | default._domainkey | DKIM value | Email authenticity |
| DMARC Record | _dmarc | “v=DMARC1; p=none” | Stops phishing |
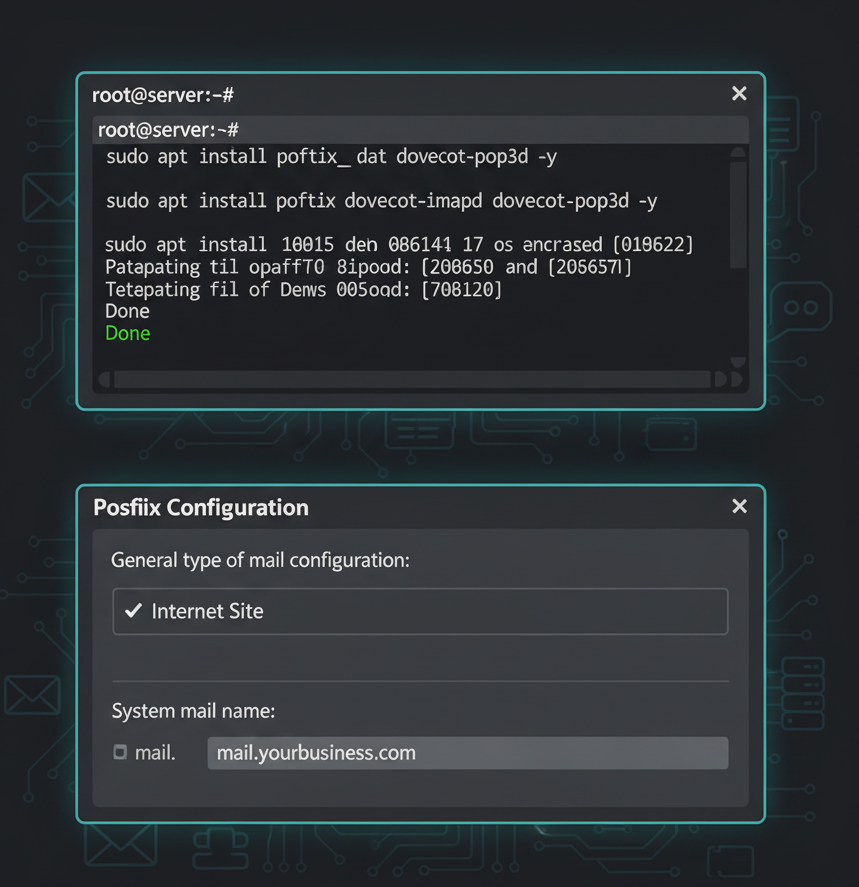
Step 3: Install Mail Services
Use Postfix for sending and Dovecot for receiving:
“sudo apt install postfix dovecot-imapd dovecot-pop3d -y”
During setup, select “Internet Site” and enter your domain.
Step 4: Add Email Users
You can add users easily:
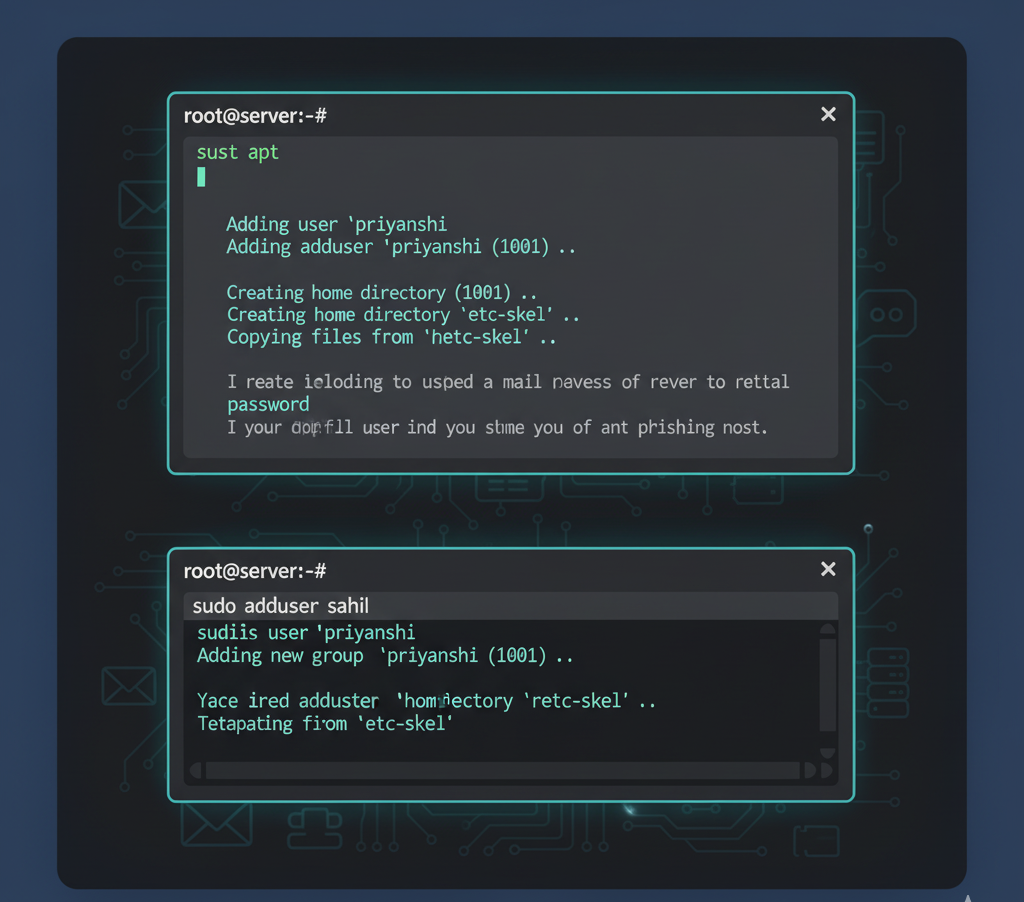
“sudo adduser priyanshi
sudo adduser sahil”
Step 5: Test It
After creating the email server, send a test email to confirm everything’s working correctly.
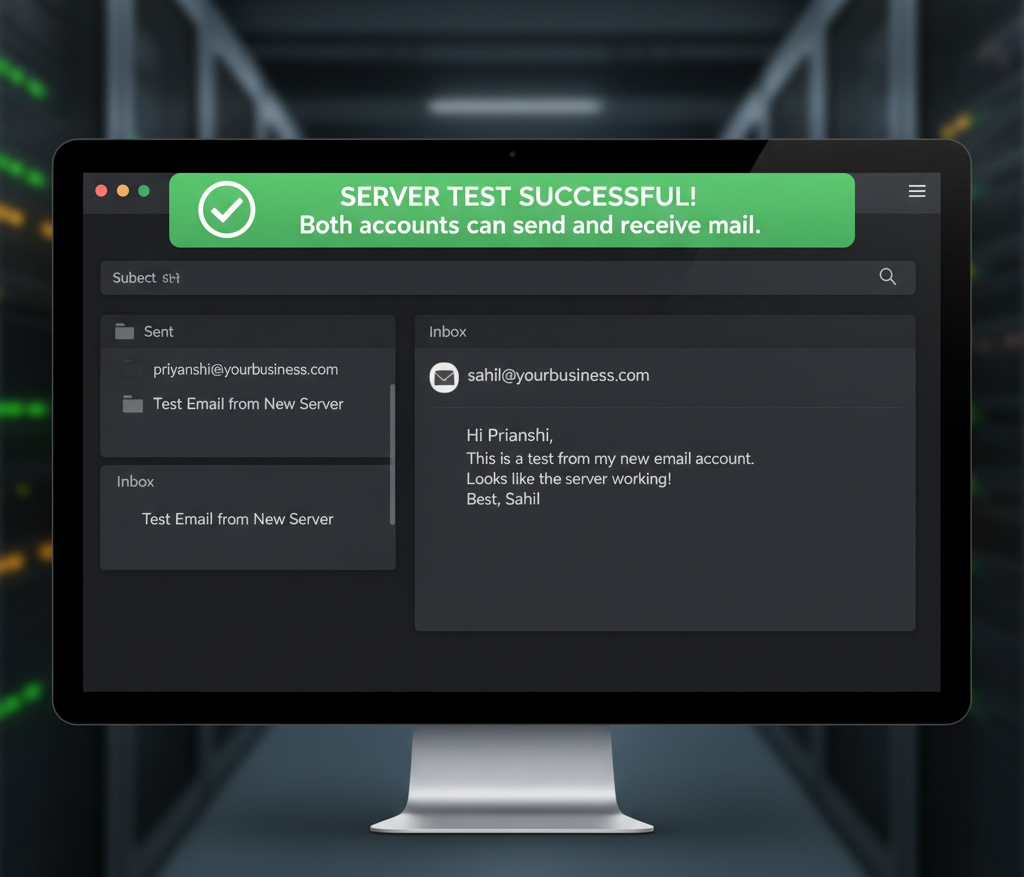
Great!! You are almost done with the setup. Now, let’s test it!!
Configuring and Securing the Email Server
Security is where many first-timers slip up. Once you’re done creating the email server, the next step is making it safe and stable.
Here’s how:
- Enable SSL/TLS Encryption using Let’s Encrypt:
sudo apt install certbot
sudo certbot certonly –standalone -d mail.yourbusiness.com
- Activate SPF, DKIM, and DMARC for sender verification.
- Set Firewall Rules — only allow ports 25, 143, 587, and 993.
- Install Spam Filters like SpamAssassin and antivirus like ClamAV.
- Create Regular Backups — automated weekly backups prevent data loss.

Testing and Troubleshooting
Once you finish creating the email server, don’t skip the testing phase.
- Send test emails between users.
- Check logs:
tail -f /var/log/mail.log
- Use mail-tester.com and mxtoolbox.com to check spam or delivery issues.
If emails bounce, review DNS records and firewall rules.
Best Practices to Maintain the Email Server
After creating the email server, regular maintenance ensures it runs smoothly.
- Update Regularly: Install security patches.
- Use Strong Passwords: Avoid weak or default credentials.
- Monitor Logs: Detect unusual login attempts early.
- Automate Backups: Use rsync or cron jobs.
- Control Resources: Limit attachment size and storage.
Example Setup: Creating the Email Server on Ubuntu
Let’s look at a quick example of creating the email server on Ubuntu 22.04.
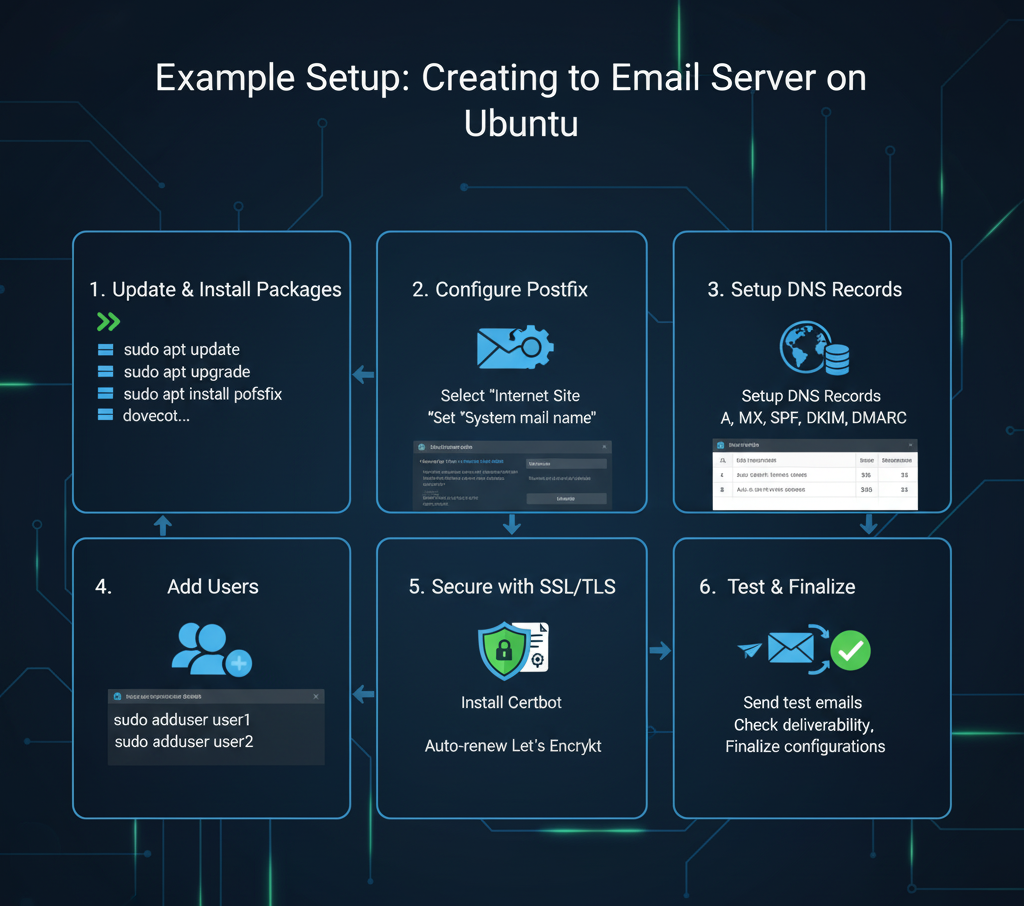
Example Scenario:
- Startup: TechFlow Labs
- Domain: techflowlabs.in
- Hosting: AWS EC2 (Ubuntu)
- Mail software: Postfix, Dovecot, Roundcube
They configured DNS, added SSL, created accounts like support@techflowlabs.in, and used webmail.
Result: Fast, private communication without third-party monitoring.
Common Mistakes to Avoid
When installing the email server, even experts can make minor yet important errors.
Here are a few things to be aware of:
- Forgetting to set Reverse DNS (PTR) records.
- Skipping SPF, DKIM, or DMARC configurations.
- Using weak or default passwords.
- Ignoring regular system updates.
- Not enabling SSL/TLS, leaving data exposed.
Conclusion
Creating your own email server might seem challenging, but you’re fully capable of doing it!
It gives you privacy, control, and a professional image for your business emails.
Think of it as building your own digital home — secure, private, and fully yours.
| Step | Task | Tools Used |
| 1 | Server Setup | Ubuntu / VPS |
| 2 | DNS Configuration | MX, SPF, DKIM, DMARC |
| 3 | Installation | Postfix, Dovecot |
| 4 | Security Setup | SSL, Firewall, SpamAssassin |
| 5 | Testing & Monitoring | Mail-tester, MXToolbox |
Ready to take control of your business communication? Start creating your email server today and see the difference!

Frequently Asked Questions (FAQs)
- What is an email server?
An email server is software that sends, receives, and stores emails for your domain. - Why should I create my own email server for my business?
It gives you full control, privacy, and professional branding for all business communications. - Do I need technical knowledge to create an email server?
Basic Linux and networking knowledge helps, but step-by-step guides make it manageable. - Can I secure my email server from spam and phishing?
Yes, by configuring SPF, DKIM, DMARC, and using SSL/TLS encryption. - How much does it cost to create an email server?
Costs include domain registration, server/VPS hosting, and optional SSL certificates — often cheaper than SaaS subscriptions long-term. - Which platforms can I use to create the email server?
Popular platforms include Ubuntu, Debian, and cloud VPS providers like AWS, DigitalOcean, and Hostinger.
Discover more from Root Learning
Subscribe to get the latest posts sent to your email.