let’s start with installation of arch OS Do you know about arch Linux OS? let known about what is Arch and their features.
Arch Linux is a lightweight, flexible, and independent Linux distribution designed for users who want full control over their operating system. It may unlike many beginner-friendly distributions. It uses a rolling release model, which means software is updated continuously without requiring a full system upgrade.

Key features of Arch Linux such as rolling release model, Pacman package manager, Customizability, Arch User Repository.
Install Arch Linux Step by step guide
- Rolling Release Model: Always up to the date of software without reinstalling the Operating System.
- Pacman Package Manager has an efficient package management and depends on handling.
- Customizability: it can be Install on what you need, you can choose the file systems, desktop environments, and system services.
- Arch User Repository (AUR): It is a community driven repository with thousands of packages.
- Lightweight & Fast: It also has minimal base system ensures high performance.
Arch Linux is ideal for advanced users, developers, and enthusiasts who value control, simplicity, and learning about Linux operating system.
Table of Contents
Arch Linux : The Ultimate Step-by-Step Setup Guide
Before you start, let make sure that you have some storage in VMware workstation with the PC specification of recommended 4GB.
Step 1:
By visiting the official site with this https://archlinux.org/download/ Open the web browser search like Chrome or Mozilla Firefox, type Arch Linux in the search bar.

Click the download and all the version of Arch Linux OS will be available If you are need to verify the checksum

If you scroll down the page, you can see download based on your location, which helps to download quickly without any issues.

Step 2:
After downloading, open the VMware Workstation.
Before creating a virtual machine, check the storage of the VMware Workstation

Step 3:
Create a new virtual machine for Arch Linux OS that you have downloaded, and make sure the download is complete.

By clicking the new virtual machine to begin the initial step. select “typical” configuration and click Enter next.
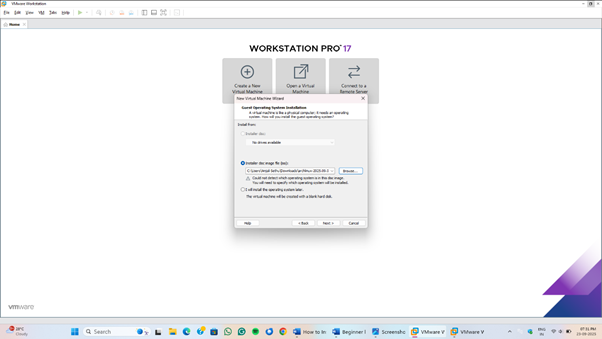
Browse and select the downloaded file, then click Next. verify the filename before proceeding

Select the guest operation system, by clicking the option as Linux and browse for the downloaded version.

Step 4:
Change the maximum disk size to 20 GB. check the storage of your virtual machine. and click the option as virtual disks to multiple files.

Step 5:
Now, the New Virtual Machine is ready to create. check the settings that you have update with name, size, version , by clicking customize hardware check the setting details.
Then click “Finish”
On the top left, open my computer in that there, you will see the new folder created for Arch Linux OS.

Step 6:
After that you can see the virtual machine that have created for Arch Linux OS and power on the virtual machine.
It starts to install the Arch Linux OS version and it takes some time for installation.

Make sure your network adapts for virtual is secure, for a smooth and easy installation.

Step 7:
After the installation of the version of Arch Linux and check the version that is visible in the screen of VMware.

If you need any help, click ctrl+h ,
Step 8:
Once the installing the version is done, you can see the settings features that is visible in your screen.

Step 9:
Select your language by clicking it and it direct to all the available languages in the version.

Step: 10
Then next click the locales to check the language and keyboard layout.

then the mirror region, refers to the geographical location of the server mirror, the Arch Linux package of versions.

Step 11:
As mirror region has available location it can help you with steady and fast to download the version.
Select your nearest location for the download.

After selecting the location, go back
click the disk configuration, the disk will show an option as partitioning. it helps by dividing the storage drive into separate sections as a container.
It shows the option of disk configuration type, use a default partition layout and it display

After verifying the model and a typo as F1 losyston with option like btrfs,oxt4,xfs.
Recommended option would be Btrfs (B-Tree File System) it is a great for system rollbacks and slightly overhead but flexible.

click “yes”
you can use compression for the disk.


Step 12:
let’s go with disk encryption, it is process of converting all the data that is stored in the device into an unreadable format using cryptology.

If there is no encryption you need to choose the type as “LUKS” (Linux Unified Key Setup) is a full disk encryption in Linux and also works at the block device layer.

Swap is disk space used as virtual memory when your RAM storage is full.
Then click “yes” for use of swap in the disk.

Step 13:
Boot loader is responsible for loading the operating system kernel into memory.
Select the Boot loader and click the default as “systemd-boot”

Unified Kernel Image (UKI) is a single file combining the Linux kernel .
For simpler, faster, and secure booting.
if the unified kernel images are disable
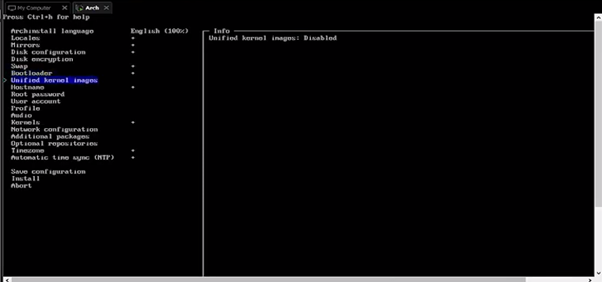
Click “yes” to enable the kernel image.

Step 14:
Then the Host name, Host password, User account, Profile are created in the following steps.
Use host name and password simple and easy.
If you need help press ctrl+h for help.


Click the user account and add the name and password, then confirm the password.


Verify the username and click “yes” to continue

Then continue after verifying and click “confirm and exit”

click the profile, and a list of pro-programmed default profile will be view.
you can go with desktop and continue.

Step 15:
After the default profile, it directs to the page of information with environment type and installed package
you can select “KDE Plasma”

In audio server you can go with Pipe Wire, it is the modern audio or video system in Arch Linux.
It can handle sound and multimedia streams.

In kernel use Linux option as default in the disk.
Then, continue

Step 16:
For Network configuration use the “network manager to configure graphically in Gnome and KDE plasma” if you prefer manual configuration, it may be unstable and have issue in network adapt.

Clicking time zone can be selected by the locations that is available.

Finally check the update of configuration in the settings.
Click “Install”

Step 17:
Installation takes some times if you have enough storage and no issue in network.
you experience smooth installation.
click “yes” to apply the configuration.

Continue with clicking” yes” for post installation configuration and also it newly created installation.

After sometime the installation of Arch Linux version will be completed.

Step 19:
Use the created username and password for your version of Arch Linux
Select the username and, Enter password

The page will redirect into the Arch Linux operating system
Then read the page and click “Next”
Step 20:
Finally, you can see the Arch Linux Operating System

Start Your Arch Linux Journey Today
Ready to take full control of your Linux system? Start your Arch Linux journey today and build a system tailored just for you!
FAQ (Frequently Asked Questions)
1. Is Arch Linux good for beginners?
Arch Linux is often seen as advanced because it requires manual installation and configuration. as a beginner you can try with the guide for a deep understanding.
2. How long does it take to install Arch Linux?
It usually takes 30–60 minutes, depending on your system with Linux, partitioning, and network speed. As a beginner you might take longer the first time.
3. Do I need internet to install Arch Linux?
Yes. Arch Linux uses a minimal ISO, and most packages are downloaded during installation. A working internet connection is required.
4. Can I dual-boot Arch Linux with Windows?
Yes, you can create free space for Arch Linux during Windows installation. During Arch installation, make sure to install GRUB with both Windows and Arch entries.
5. What desktop environments can I install on Arch Linux?
You can install any DE or WM, such as GNOME is easy and modern, KDE Plasma has feature-rich and customizable, XFCE is a lightweight desktop environment.
6. What’s the difference between Arch Linux and other distros like Ubuntu?
Arch Linux has Minimal base, rolling release, full user control, requires manual setup.
But Ubuntu is a preconfigured, beginner-friendly, fixed release cycle.
If you want maximum control and the latest packages, choose Arch. If you want a ready-to-use system, choose Ubuntu.
7. What if I mess up the installation?
you can always reboot into the live ISO and start again. The Arch Linux provides detailed troubleshooting for most issues.
8. Do I need to reinstall Arch Linux often?
No, Since Arch Linux is rolling release, you install once and keep updating there is no need to reinstall for new versions.
Discover more from Root Learning
Subscribe to get the latest posts sent to your email.