Are you looking for a lightweight Linux operating system to run containers and cloud-native applications? Photon OS is an excellent option worth exploring. Developed by VMware, this Linux distribution is designed to deliver impressive performance, efficient resource utilization, and a secure environment for modern container-based workloads.
Whether you are a Linux beginner, developer, system administrator, or technology enthusiast, installing Photon OS on VMware is a great way to explore its capabilities without changing your existing operating system.
In this step-by-step guide, you will learn how to download the installation image, create a virtual machine, configure the required settings, and successfully install Photon OS using VMware Workstation in 2026.
Let’s get started!
Table of Contents
What Is Photon OS?
Photon OS https://vmware.github.io/photon/ is a lightweight, open-source Linux operating system developed by VMware. It is specifically designed for cloud computing, containerized applications, and modern infrastructure environments.
Unlike traditional desktop Linux distributions, OS focuses on providing a minimal operating environment with only the essential components required to run applications and containers.
It supports technologies such as Docker, Kubernetes, and other cloud-native tools, making it a useful platform for developers and IT professionals.
Here are some important features:
- Lightweight architecture: Uses fewer system resources compared with many general-purpose Linux distributions.
- Container-friendly environment: Designed to support container runtimes and cloud-native applications.
- Enhanced security: Includes security-focused configurations and hardened packages.
- Efficient performance: Optimized for virtualized and cloud environments.
- Package management: Uses the TDNF package manager to install and manage software.
These capabilities make Photon a practical choice for learning Linux-based container environments and experimenting with virtualization.
Why Install Photon OS on VMware?
VMware Workstation allows you to run multiple operating systems on a single computer without creating separate physical machines.
Installing Photon OS inside VMware offers several advantages:
- Safe learning environment: Experiment with Linux commands and configurations without affecting your primary operating system.
- Easy testing: Test Docker containers and cloud-native applications in an isolated virtual machine.
- Flexible resource allocation: Adjust memory, processor cores, and storage according to your requirements.
- Convenient snapshots: Save virtual machine states and restore them when required.
- Cost-effective setup: Explore Linux virtualization without purchasing additional hardware.
For beginners, VMware provides a convenient way to understand how a lightweight Linux operating system works.
System Requirements for Photon OS Installation
Before beginning the installation, ensure that your computer meets the basic requirements.
The following configuration is a practical starting point for a learning environment. Actual requirements depend on the installation type and workloads.
Component Recommended configuration
Operating System Windows or Linux
Virtualization Software VMware Workstation
Processor 64-bit processor
RAM 2 GB or more available
Virtual Disk 8 GB minimum for this walkthrough
Installation File Photon OS ISO
Internet Recommended
Important: VMware’s official Workstation prerequisites recommend 2 GB of free RAM. Its documentation specifies 512 MB minimum free storage for a minimal installation and 4 GB for a full installation, with 8 GB recommended. Additional disk space is useful for Docker images and applications.
Step-by-Step Guide to Install Photon OS on VMware
Now that you understand the requirements, let’s walk through the complete installation process.
Step 1: Download the Photon OS ISO Image
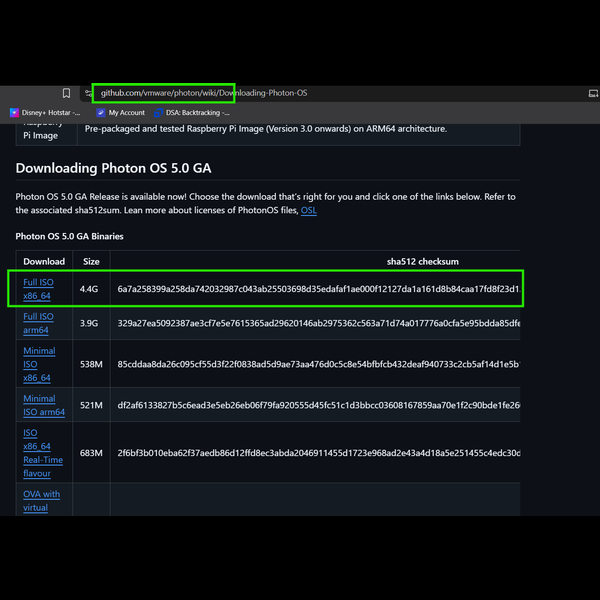
The first step is downloading the official installation image.
- Open the official Photon OS website.
- Navigate to the download section.
- Select the ISO image suitable for your system architecture.
- Choose the Minimal or Full ISO, depending on your requirements.
- Download the file and save it to an easily accessible folder.
Step 2: Open VMware Workstation
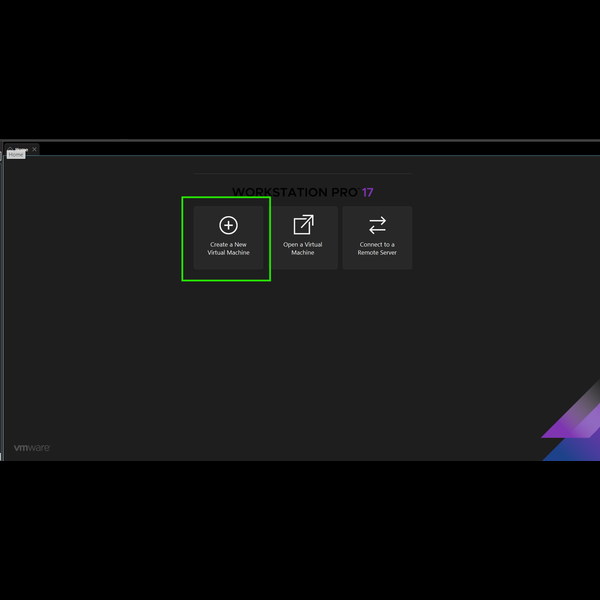
After downloading the ISO file, launch VMware Workstation on your computer.
Follow these instructions:
- Open VMware Workstation.
- Click on File in the top menu.
- Select New Virtual Machine.
- Choose the Typical (Recommended) installation option.
- Click Next to continue.
The Typical installation option is convenient for beginners because it automatically configures several basic virtual machine settings.
Step 3: Select the Photon OS ISO File
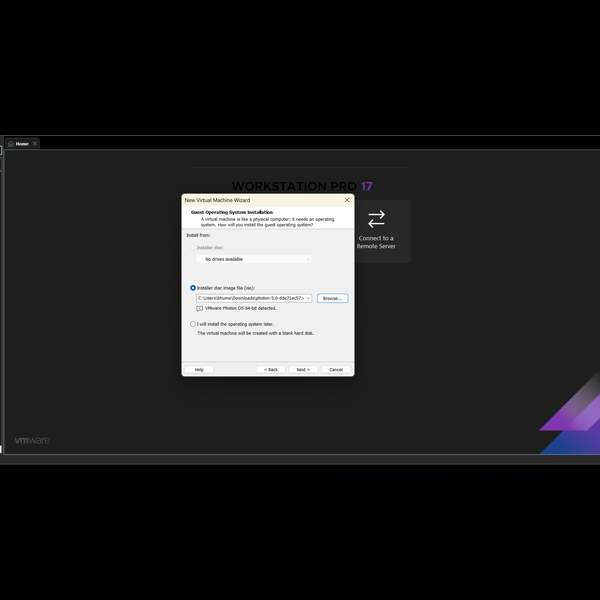
Now, you need to connect the downloaded ISO image to your virtual machine.
- Select Installer disc image file (ISO).
- Click Browse.
- Locate the Photon OS ISO file you downloaded.
- Select the file and click Next.
VMware will use this ISO image to boot the virtual machine and start the installation process.
Step 4: Select the Guest Operating System
In this step, VMware asks you to specify the guest operating system.
Select the following options:
- Guest Operating System: Linux
- Version: VMware Photon 64-bit
If VMware Workstation does not display the specific Photon option, select the closest available 64-bit Linux option supported by your version.
Click Next to proceed.
Step 5: Configure the Virtual Machine Name
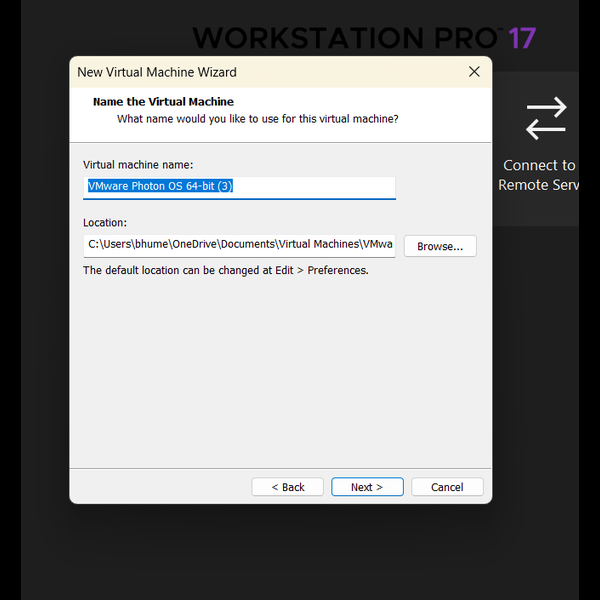
Provide a suitable name for your virtual machine.
For example:
- Virtual Machine Name: Photon OS
- Location: Select your preferred storage folder.
Click Next after entering these details.
Choosing a recognizable name will help you identify the virtual machine if you install multiple Linux distributions.
Step 6: Configure Virtual Disk Capacity
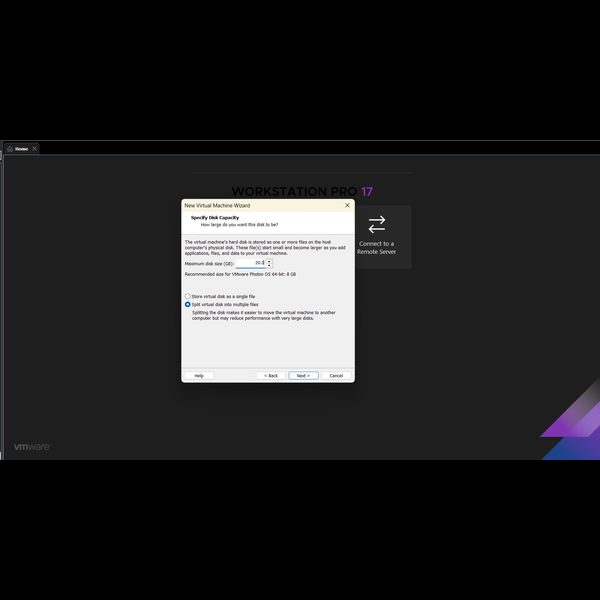
Next, configure the virtual hard disk.
For this walkthrough, you can use:
- Maximum Disk Size: 8 GB or more
- Disk Storage: Store virtual disk as a single file or split it into multiple files.
If you plan to install Docker and download multiple container images, consider allocating additional storage.
Click Next to continue.
Step 7: Customize Virtual Machine Hardware
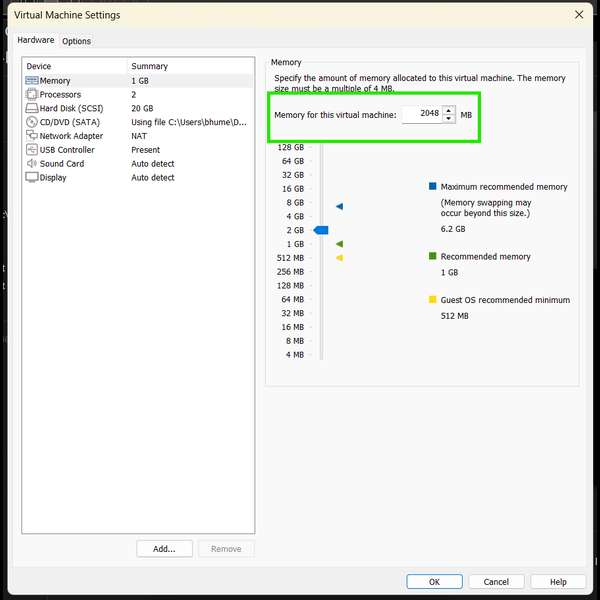
Before completing the virtual machine setup, review the hardware configuration.
Click Customize Hardware and configure the following:
Hardware Suggested setting
Memory 2 GB
Processor 1–2 cores
Hard Disk 8 GB or more
Network Adapter NAT
CD/DVD Photon OS ISO
You can also disable unnecessary devices, such as the sound card, if they are not required.
VMware’s official installation instructions recommend removing unnecessary hardware components for a container-focused environment.
Click Close and then Finish.
Step 8: Power On the Virtual Machine
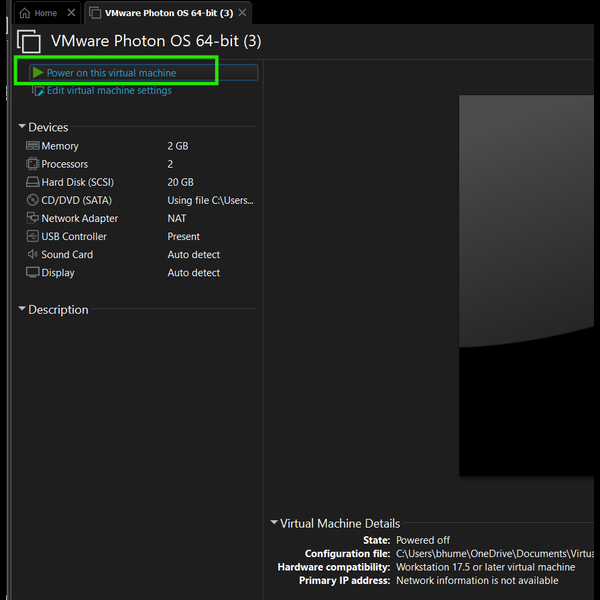
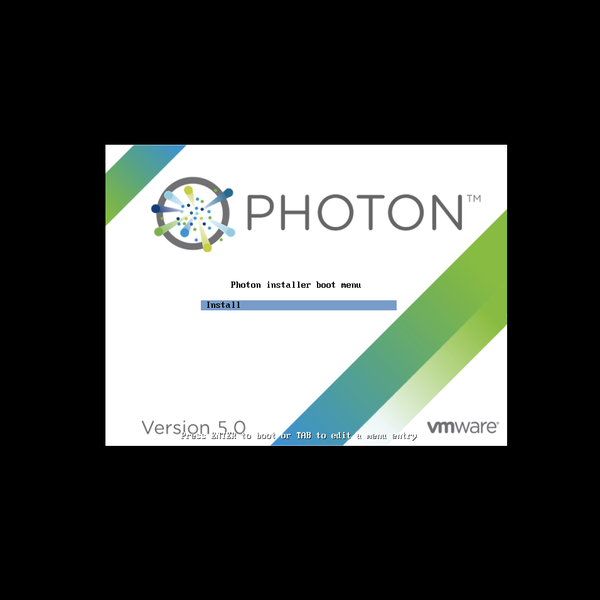
Your virtual machine is now ready to boot.
- Select the Photon OS virtual machine.
- Click Power on this virtual machine.
- Wait for the Photon Installer boot menu.
- Press Enter to start the installation.
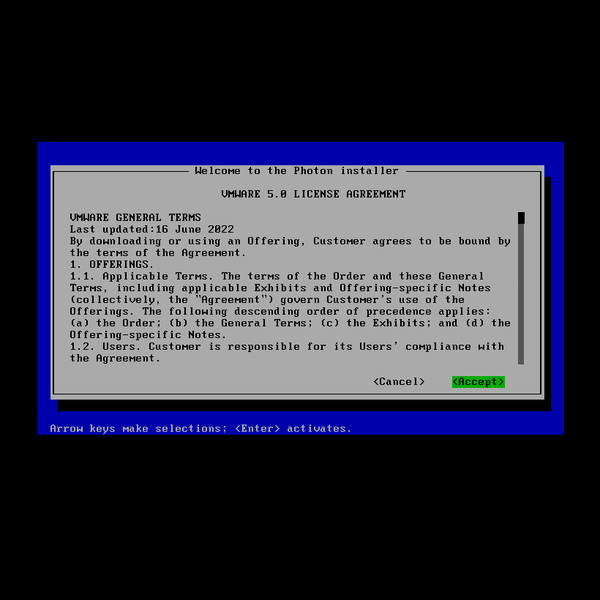
The installer will load and display the license agreement.
Read the agreement, select Accept, and press Enter to continue.
Step 9: Configure Disk Partitioning
The installer will detect the virtual hard disk you created earlier.
You generally have two options:
- Auto: Automatically creates the required partitions.
- Custom: Allows you to configure partitions manually.
For beginners, selecting Auto is the easiest option.
Select Auto and press Enter. The installer will ask you to confirm that the disk can be erased.
Important: This operation erases the selected virtual disk. Make sure you are working with the newly created virtual machine rather than an existing disk containing important data.
Step 10: Select the Installation Type
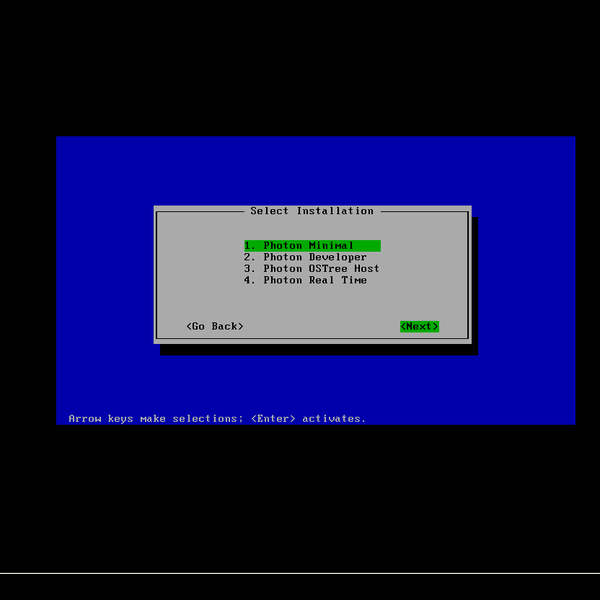
Now, select the installation type according to your requirements.
Photon OS provides different installation options, including Minimal and Full.
- Minimal Installation: Recommended for lightweight environments and container workloads.
- Full Installation: Suitable when you need additional packages and utilities.
For this tutorial, choose Minimal Installation to keep the virtual machine lightweight.
Step 11: Configure Network and Linux Kernel
The next step involves configuring network settings and selecting the Linux kernel.
You can configure the network using the available installer options. For a basic VMware setup, NAT networking is generally convenient because it allows the virtual machine to access the internet through the host computer.
Next, select the Linux kernel:
- Hypervisor Optimized: Removes components that are unnecessary for VMware environments.
- Generic: Includes broader hardware support.
For this VMware installation, the Hypervisor Optimized option is a suitable choice.
Step 12: Set the Hostname and Root Password
The installer will ask you to configure a hostname for your virtual machine.
You can use a simple hostname such as:
photon-vm
Next, create a strong root password.
Follow these recommendations:
- Use uppercase and lowercase letters.
- Include numbers and special characters.
- Avoid commonly used passwords.
- Store your password securely.
You will need these credentials to access and administer your Photon OS system.
Step 13: Complete the Installation and Reboot
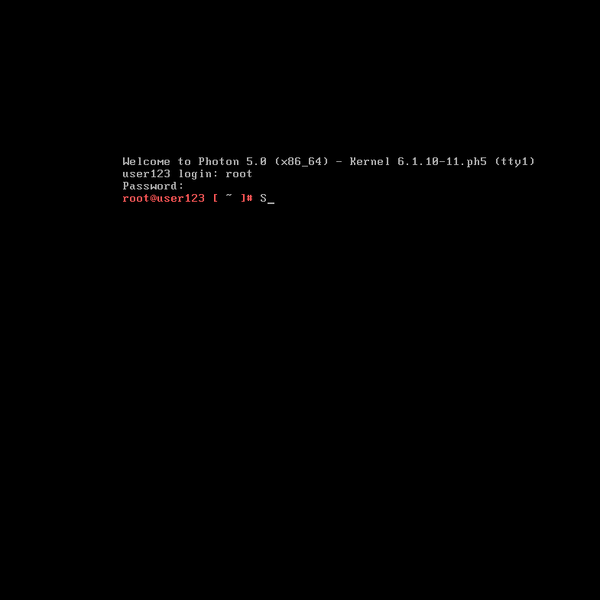
Once you have configured all the required settings, the installer will begin copying and installing the selected packages.
Wait until the installation process finishes.
After successful installation:
- Follow the installer’s reboot prompt.
- Allow the virtual machine to restart.
- Remove or disconnect the ISO image if the VM boots into the installer again.
- Wait for the login screen.
- Enter root as the username.
- Provide the password you created earlier.
Congratulations! Your Photon OS installation on VMware is complete.
How to Install Docker on Photon OS?
One of the biggest advantages of Photon OS is its container-friendly architecture.
If you want to experiment with Docker, first update the package metadata and install the Docker package.
Run the following commands:
tdnf makecache
tdnf install docker
After installation, start the Docker service:
systemctl enable –now docker
Verify whether Docker is running:
systemctl status docker
Check the Docker version:
docker –version
You can now start exploring containerized applications.
Photon OS vs Ubuntu: Which One Should You Choose?
Both Photon OS and Ubuntu are popular Linux distributions, but they are designed with different use cases in mind.
Feature Photon OS Ubuntu
Primary Purpose Containers and cloud workloads General-purpose computing
Architecture Lightweight More general-purpose
Package Manager TDNF APT
Desktop Experience Minimal by default Desktop editions available
Container Support Designed for container workloads Supports Docker and other runtimes
Best For VMware and cloud-native environments Developers, servers and desktops
Which should you choose?
Choose Photon OS if you want a lightweight Linux environment optimized for containers and VMware infrastructure.
Choose Ubuntu if you need a versatile Linux distribution for desktop applications, development, servers, and everyday computing.
Both distributions offer valuable features. Your choice should depend on your project requirements.
Common Photon OS Installation Problems and Solutions
Sometimes, you may encounter problems during installation. Here are a few common issues and their possible solutions.
- VM not booting: Check whether the correct ISO image is connected to the virtual CD/DVD drive.
- No internet connection: Verify the VMware network adapter and NAT configuration.
- Insufficient disk space: Increase the virtual disk capacity before installation.
- Login failure: Check your root username and password carefully.
- Docker service not starting: Verify package installation and check the service status using systemctl.
These simple troubleshooting steps can help you resolve common setup issues and enjoy a smoother installation experience.
Frequently Asked Questions (FAQs)
- What is Photon OS used for?
This OS is a lightweight Linux distribution developed by VMware for running containerized applications, cloud-native workloads, and virtualized environments.
- Is Photon OS free to use?
Yes. This OS is an open-source Linux distribution that users can download and use according to its licensing terms.
- Can I install Photon OS on VMware Workstation?
Yes. You can install it on VMware Workstation using an official ISO image or deploy a preconfigured OVA virtual appliance.
- How much RAM does Photon OS require?
VMware recommends 2 GB of free RAM as a starting point for running this OS on Workstation. Actual requirements depend on your workloads.
- Which ISO version should I download?
Choose the Minimal ISO for lightweight container workloads. Select the Full ISO if you need additional packages and utilities.
- Does Photon OS support Docker?
Yes. This OS supports Docker and provides package management facilities to install and manage container-related software.
- What is the difference between Photon OS and Ubuntu?
This OS focuses on lightweight container and cloud environments, whereas Ubuntu is a general-purpose Linux distribution suitable for desktops, servers, and development.
- Can beginners learn Linux using Photon OS?
Yes. Beginners can use it to explore Linux commands, package management, networking, virtualization, and container technologies. However, Ubuntu may be easier for those looking for a desktop-based learning experience.
- Can I install Photon OS without VMware?
Yes. Photon OS can also run on supported physical hardware and other virtualization or cloud platforms. VMware is not the only deployment option.
- How do I update packages in Photon OS?
You can use the TDNF package manager to manage packages. For example, run tdnf update to update installed packages when updates are available in your configured repositories.
Conclusion
Installing Photon OS on VMware in 2026 is a straightforward process when you follow the correct steps. From downloading the official ISO image and configuring your virtual machine to completing the installation and setting up Docker, each step helps you build a functional Linux environment.
Its lightweight architecture, security-focused design, and container-friendly capabilities make Photon OS an excellent platform for exploring modern virtualization and cloud-native technologies.
Whether you are a beginner learning Linux or an experienced developer experimenting with Docker, this installation guide gives you a practical starting point.
So, get started with Photon OS today and explore the exciting possibilities of lightweight Linux virtualization!
Discover more from Root Learning
Subscribe to get the latest posts sent to your email.