Introduction
Amazon Relational Database Service (Amazon RDS) is an AWS service that makes it easier to create, operate, and manage relational databases in the cloud. It helps users set up a database without manually managing many of the underlying administrative tasks, such as database software installation, routine backups, and infrastructure maintenance.
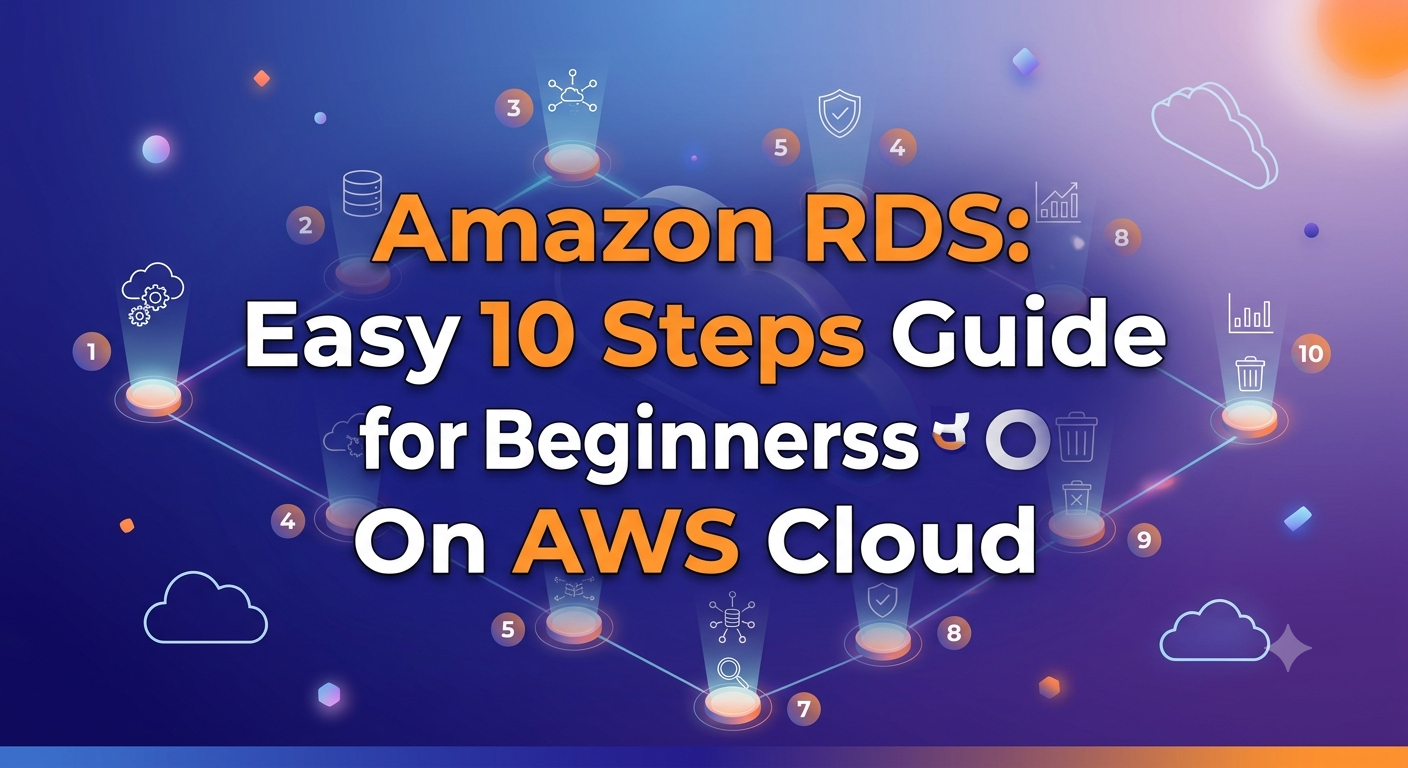
For beginners learning AWS Cloud, Amazon RDS is a useful service to explore because it demonstrates how cloud databases are created and configured through the AWS Management Console. In this practical guide, we will walk through the Amazon RDS database creation process, including selecting a database engine, choosing a template, configuring connectivity, and reviewing the database settings. Practical objective: Create an Amazon RDS database using the AWS Management Console and understand the main configuration options.
Table of Contents
Prerequisites
Before starting the procedure, ensure you have:
- An active AWS account.
- Access to the AWS Management Console.
- Permission to create and manage Amazon RDS resources.
- A basic understanding of cloud computing.
- Awareness of AWS Free Tier eligibility and possible charges.
You do not need an existing EC2 instance to begin. During our practical session, we selected the option not to connect the database to an EC2 instance because there was no currently running EC2 instance available for the connection workflow.
Step 1: Sign In to The AWS Management Console
- Open the AWS Management Console in your web browser.
- Sign in using your AWS account credentials.
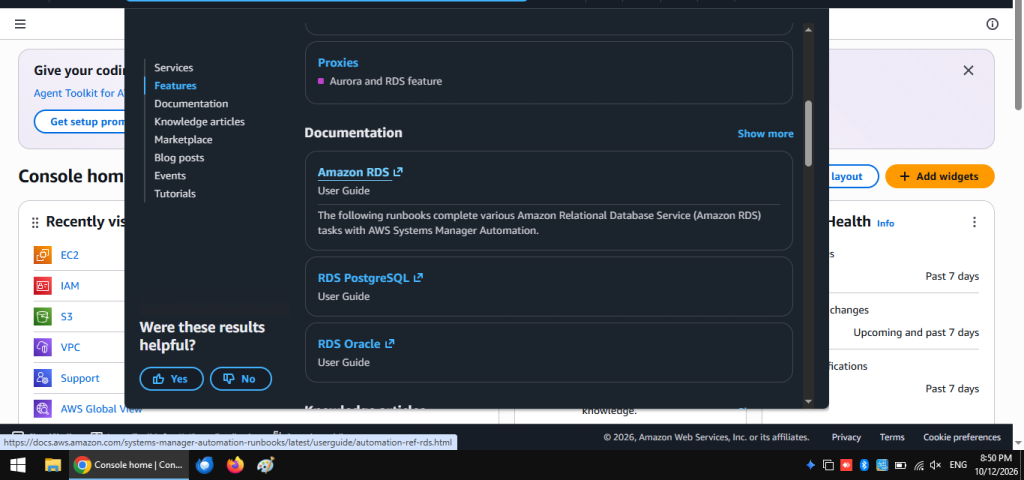
- Locate the search bar at the top of the console.
- Enter RDS in the search bar.
- Select Amazon RDS from the search results.
The Amazon RDS dashboard provides access to database creation, database monitoring, configuration, and other database management features.
Step 2: Start Creating a Database
- Open the Amazon RDS dashboard.
- Select Create database.
- Wait for the database creation page to load.
- Review the available database creation methods.
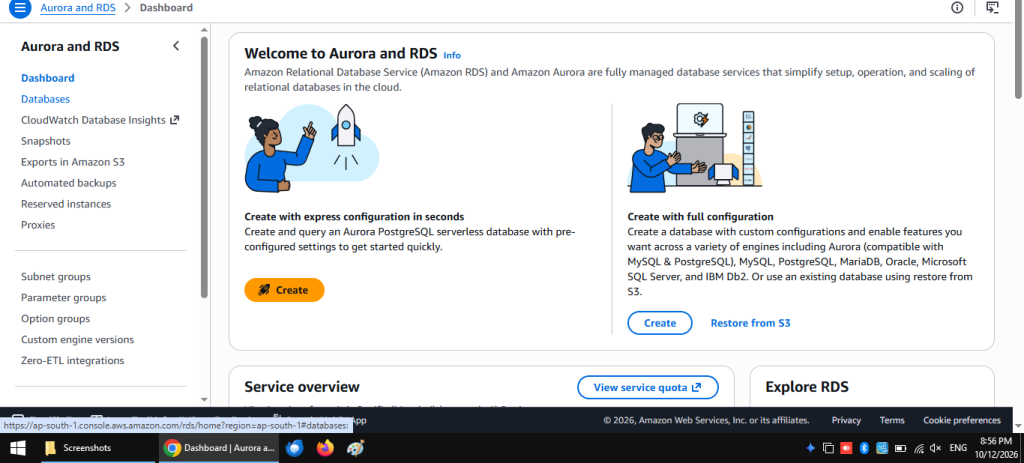
During our practical session, the console displayed three options:
- Easy create / Express configuration: Uses simplified settings to create a database quickly, where available.
- Standard create / Full configuration: Provides more control over the database engine, credentials, storage, connectivity, and other settings.
- Restore from S3: Restores supported database backups or data from Amazon S3 using the supported restore workflow.
The exact wording and available options may vary depending on the console version and selected database engine.
For a beginner-friendly hands-on assignment, the standard or full configuration option is useful because it lets you understand the individual settings.
Step 3: Select the Database Engine
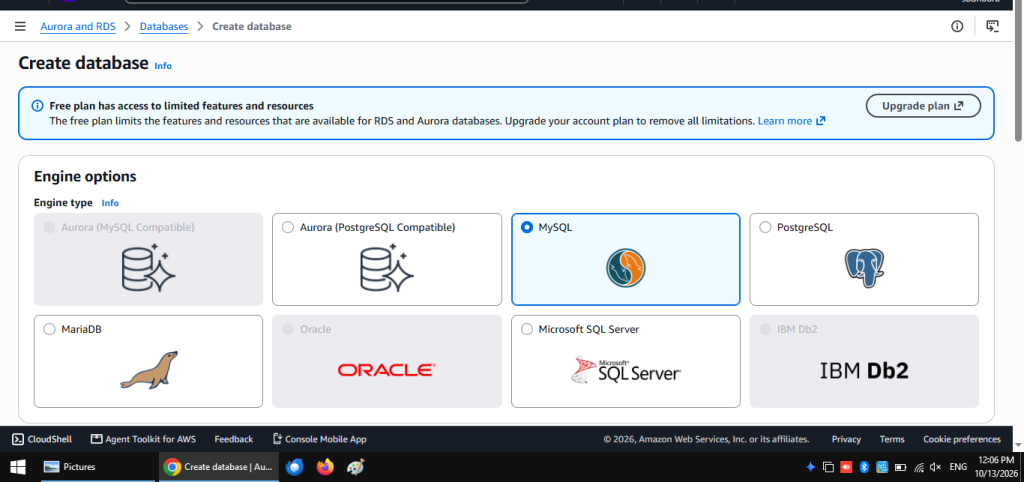
A database engine is the software that stores, organises, and manages information in a database.
it includes:
- MySQL
- PostgreSQL
- MariaDB
- Oracle
- Microsoft SQL Server
- Amazon Aurora
Choose the engine that matches your learning objective. MySQL is a reasonable option for a beginner demonstration because it is widely used in web applications and has a large learning community. After selecting an engine, review the available engine versions and any associated eligibility restrictions.
Step 4: Choose the Database Template
The database template determines a set of recommended configuration defaults.
Depending on your account and the selected engine, you may see options such as:
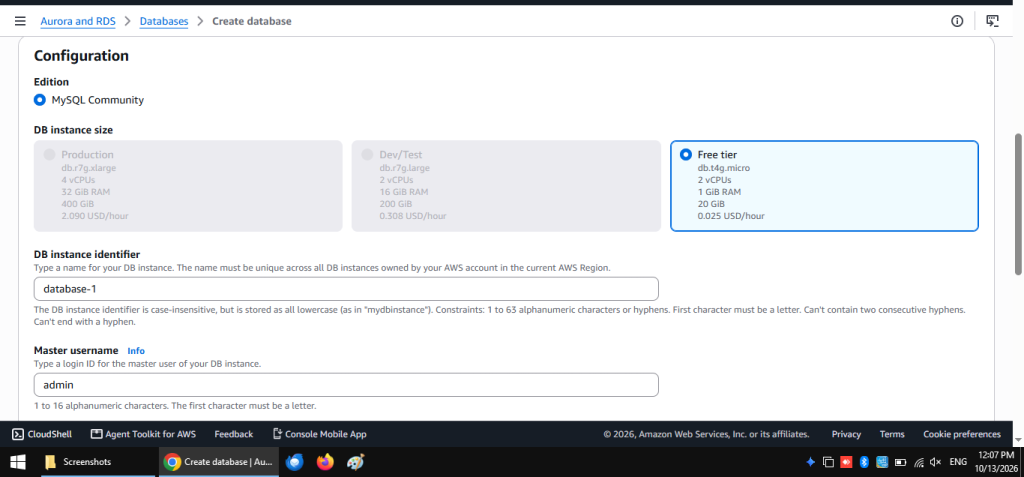
- Free tier: Intended for eligible accounts and supported configurations.
- Dev/Test: Intended for development and testing workloads.
- Production: Intended for business applications that require stronger availability and performance configurations.
For our beginner practical, select Free tier if it is available and suitable for your account. Do not assume that choosing a Free Tier template makes every resource or configuration free. Check the selected database instance class, storage, backup settings, and applicable account benefits before creating the database.
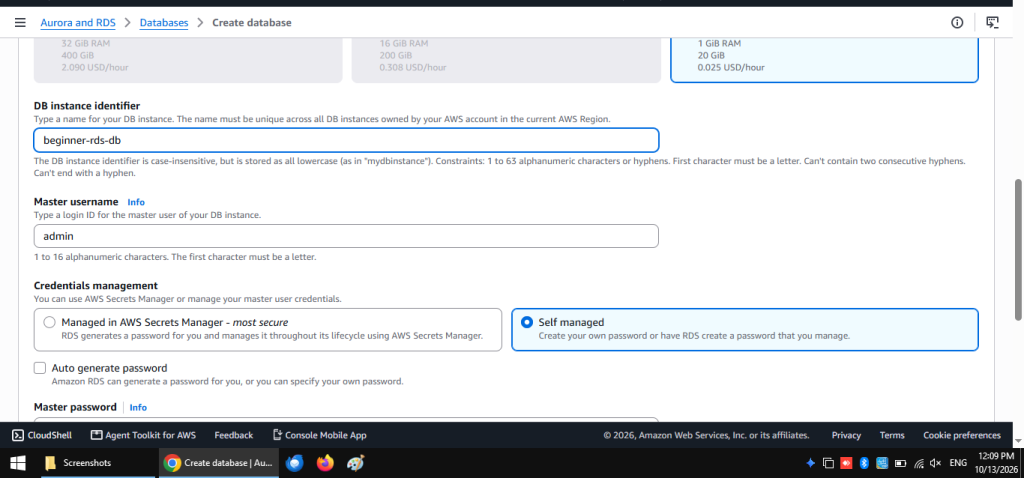
Step 5: Configure the Database Identifier and Credentials
In the Settings section, provide the details needed to identify and access your database.
- Enter a unique DB instance identifier, such as beginner-rds-db.
- Store the password securely.
The DB instance identifier is the name used to identify the database instance in the AWS console. The master username is used for administrative database access.
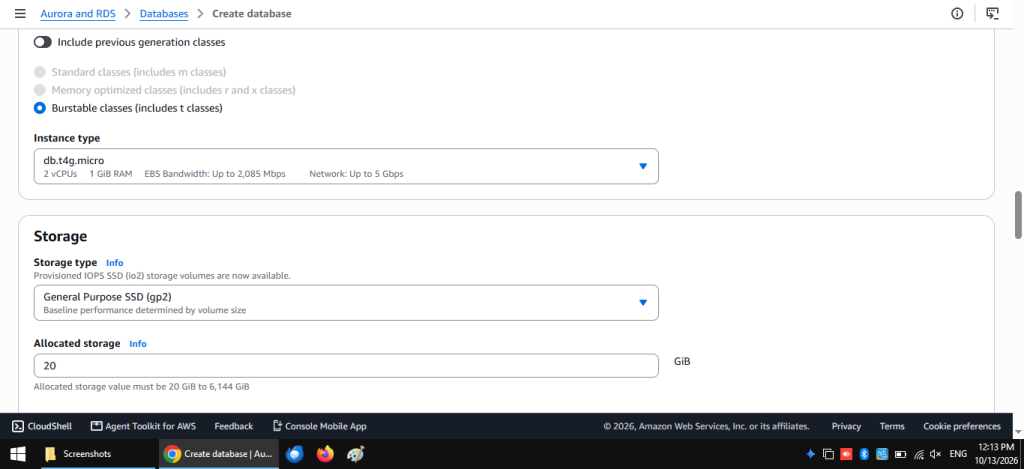
Step 6: Configure the Database Instance and Storage
The database instance class determines the computing capacity available to the database.
For a learning project:
- Select the eligible instance class recommended by the available beginner template.
- Review the allocated storage.
- Check whether storage autoscaling is enabled.
- Review the availability and durability settings.
- Avoid selecting larger instances or advanced configurations unless your assignment requires them.
A production database may require high availability, additional capacity, and stronger recovery options. A small learning database usually has different requirements.
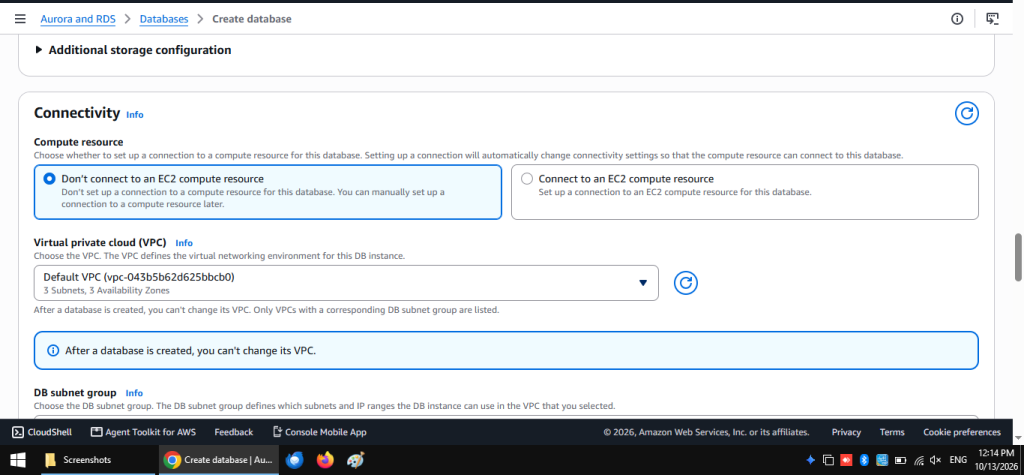
Step 7: Configure Connectivity
Connectivity determines how an application or computer can communicate with the database.
During our practical session, the console displayed two options:
- Don’t connect to an EC2 compute resource
- Connect to an EC2 compute resource
Select Don’t Connect to an EC2 Compute resource.
- Find the Connectivity section.
- Review the Virtual Private Cloud (VPC) selection.
- Review the DB subnet group and security group settings.
- Review the Public access setting.
Choosing not to connect to EC2 does not prevent you from connecting to the database later. It simply means you are not asking the console to configure that particular EC2-to-RDS connection automatically. A VPC provides an isolated networking environment for AWS resources. A security group acts as a virtual firewall that controls permitted network traffic.
Security recommendation: Keep public access disabled for a beginner database when possible. If you later connect from an EC2 instance, configure the database security group to permit the required database port from the EC2 security group rather than opening access to everyone.
Step 8: Review Additional Settings
Before creating the database, review the remaining configuration sections.
Depending on your selected engine and template, these may include:
- Initial database name
- Database port
- Backup retention period
- Encryption
- Monitoring
- Maintenance preferences
- Deletion protection
- Log exports
You do not need to enable every advanced feature for a beginner demonstration. However, you should understand that these settings can affect security, recovery, performance, and cost. Pay particular attention to deletion protection and backup retention. These features may be helpful for important databases, but their configuration should match your learning objective and budget.
If you specify an initial database name, record it for later use. Otherwise, the database instance may be created without the initial database name you expected.
Step 9: Create the Amazon RDS Database
Once you have reviewed all the settings:
- Scroll to the bottom of the database creation page.
- Review the estimated configuration and any displayed pricing information.
- Select Create database.
- Wait for AWS to begin provisioning the database.
- Open the Databases page to check its status.
The database status may initially display Creating. Provisioning can take several minutes or longer, depending on the configuration.
Step 10: Verify the Database Status
After creating the database, verify whether AWS has finished provisioning it.
- Open the Amazon RDS console.
- Select Databases from the navigation pane.
- Find the database you created.
- Check the Status column.
- Wait until the status changes to Available.
- Select the database identifier to review its details.
When the status becomes Available, the database instance has completed its provisioning process and is ready for supported connection attempts, subject to network access and credentials.
Review the database details page for information such as the engine, instance identifier, endpoint, port, and connectivity settings.
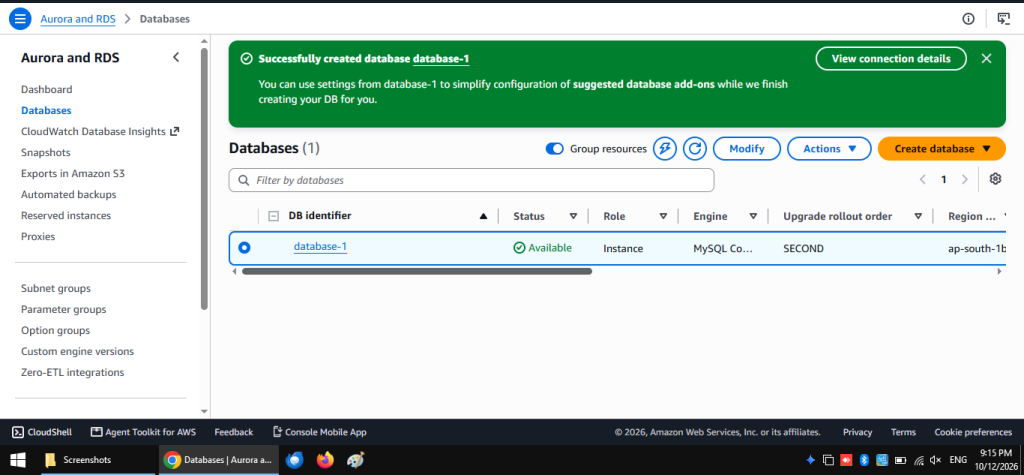
Important distinction: A database status of Available does not prove that you have successfully connected to it or executed a SQL query. Our documented practical focused on database creation and configuration; a separate connection test is needed to demonstrate actual database access.
Troubleshooting Common Amazon RDS Issues
| Issue | Possible Solution |
| Database remains in Creation status | Wait and refresh the database page |
| Free tire option is missing | Check your account type, selected engine, Region, and current eligibility. |
| No EC2 instance is available | Select “Don’t Connect to an EC2 compute resource.” |
| Database connection fails | Check the endpoint, port, credentials, VPC, routing, and security group rules. |
| Database access is blocked | Verify that the client is permitted by the database security group. |
| Unexpected AWS charges appear | Review RDS, storage, backup, snapshot, and networking usage in AWS Billing. |
Cost Management and Cleanup
Cost management is an important part of every AWS practical assignment. An RDS database can incur charges while it is running, and choosing a Free tier template alone does not guarantee zero cost.
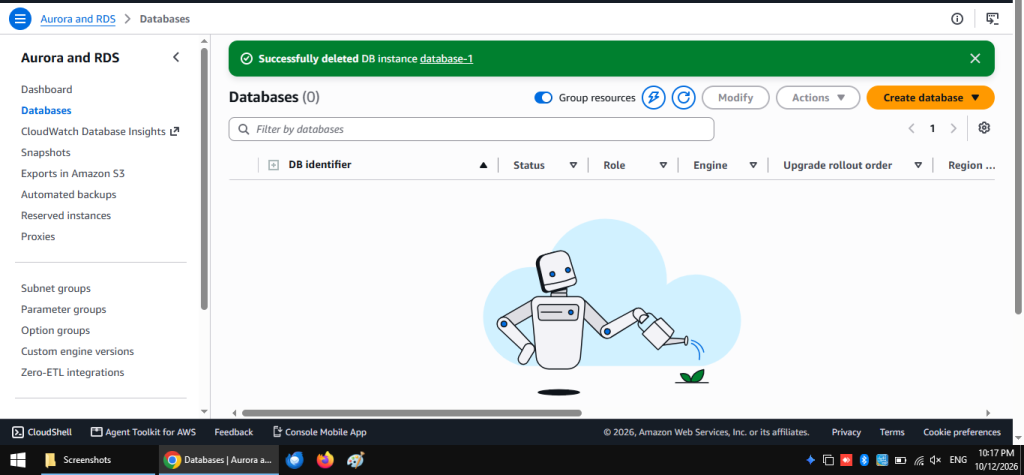
If you no longer need the database, follow these steps:
- Open the Amazon RDS console.
- Select Databases.
- Select your database instance.
- Choose Actions → Delete.
- Review the final snapshot and automated backup options.
- Confirm deletion only after checking whether you need to retain any data.
Deleting a database is permanent for the deleted instance’s data unless you retain a recoverable backup or snapshot. Retained snapshots and backups may continue to incur charges.
If you want to keep the database for another practical session, you may be able to stop it temporarily. However, stopped databases can still incur storage and backup charges, and supported instances automatically restart after a maximum of seven consecutive days.
My recommendation: If this practical is complete and you do not need the database again, check the AWS Billing dashboard and consider deleting the instance and any unnecessary snapshots.
Conclusion
This practical guide explains the main steps involved in creating an Amazon RDS database through the AWS Management Console. By exploring database creation methods, engine selection, templates, credentials, storage, connectivity, and status verification, beginners can develop a useful foundation in cloud database management.
FAQs
1. What is Amazon RDS?
Amazon RDS is a managed AWS service for setting up, operating, and scaling relational databases in the cloud.
2. Is Amazon RDS suitable for beginners?
Yes. Beginners can learn database creation, engine selection, networking, security, and resource management using the AWS Management Console.
3. Do I need an EC2 instance to create an RDS database? No. You can create an RDS database without connecting it to an EC2 instance during the creation process.
4. What is the difference between Easy create and Standard create?
Easy create uses simplified configuration choices, while Standard create provides greater control over database settings.
5. What does the Free tier template mean?
It identifies a configuration intended for eligible accounts and supported usage. You must still verify applicable account benefits, resource limits, and charges.
6. What is a DB instance identifier? It is the unique name you assign to identify an RDS database instance within your AWS account and Region.
7. What is a database endpoint?
An endpoint is the DNS address used by a client to locate an RDS database for connection attempts.
8. Why should I avoid public database access?
Keeping a database private reduces its exposure to internet-based connection attempts and helps limit access to authorised resources.
9. Does an Available status mean the database connection works?
No. It confirms that provisioning has completed, but you must separately test network connectivity, authentication, and database access.
10. Can Amazon RDS incur charges after I finish my assignment?
Yes. Running instances, storage, backups, snapshots, and other resources can incur charges. Review your configuration and billing information before leaving resources active.
Discover more from Root Learning
Subscribe to get the latest posts sent to your email.