Hello, Today we will learn “how to create a partition in linux” with very easy and interesting way. Partition is a way to use the storage in linux, It is one of the important steps to do when you want to add extra storage in your server. Let’s Begin now.
First we will check all the storage of our machine by “fdisk -l“.
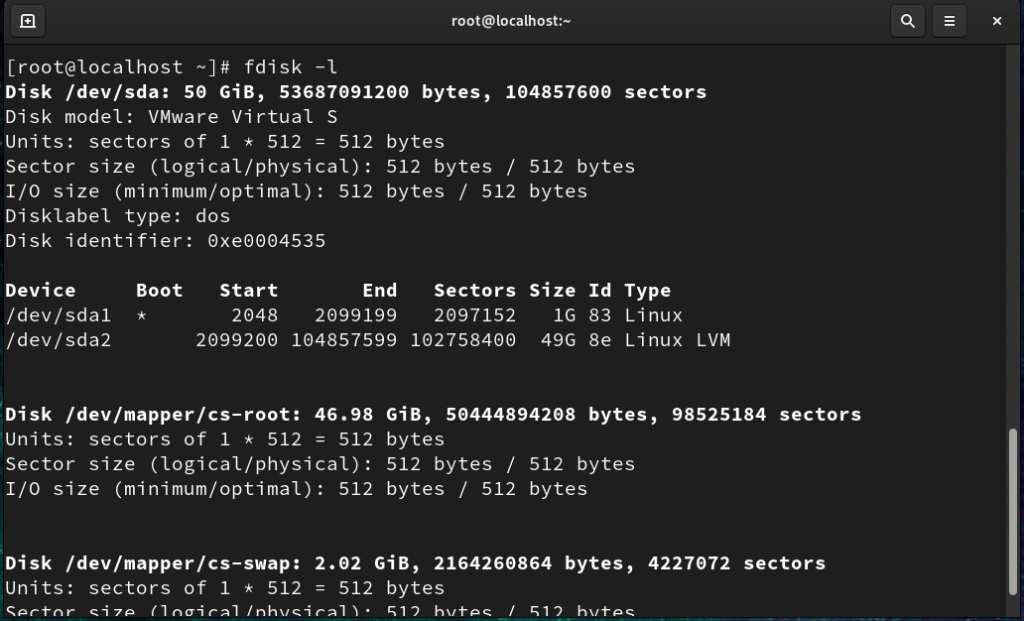
As we can see there is only one disk attached in our machine with the name “/dev/sda” with 50 GiB storage as we do not have another storage drive available to do partition, We have to add new storage disk in our virtual machine.
We have to stop our Virtual machine to perform that by clicking on “Shut Down Guest”.
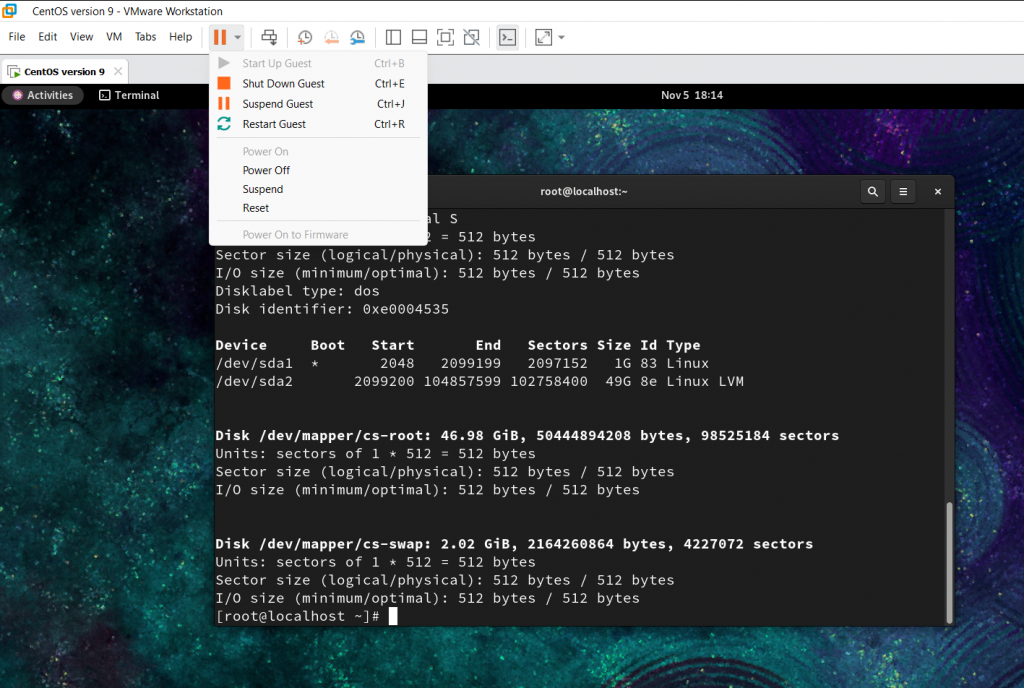
If you do not know anything about this or CentOS then you may have to see this first:
How to get your own local Centos server for free? (Part 1)
How to get your own local Centos server for free? (Part 2)
Now, We have to add one more storage of 40 GiB to our machine. We will go to “Edit virtual machine settings” and click on Hard disk.
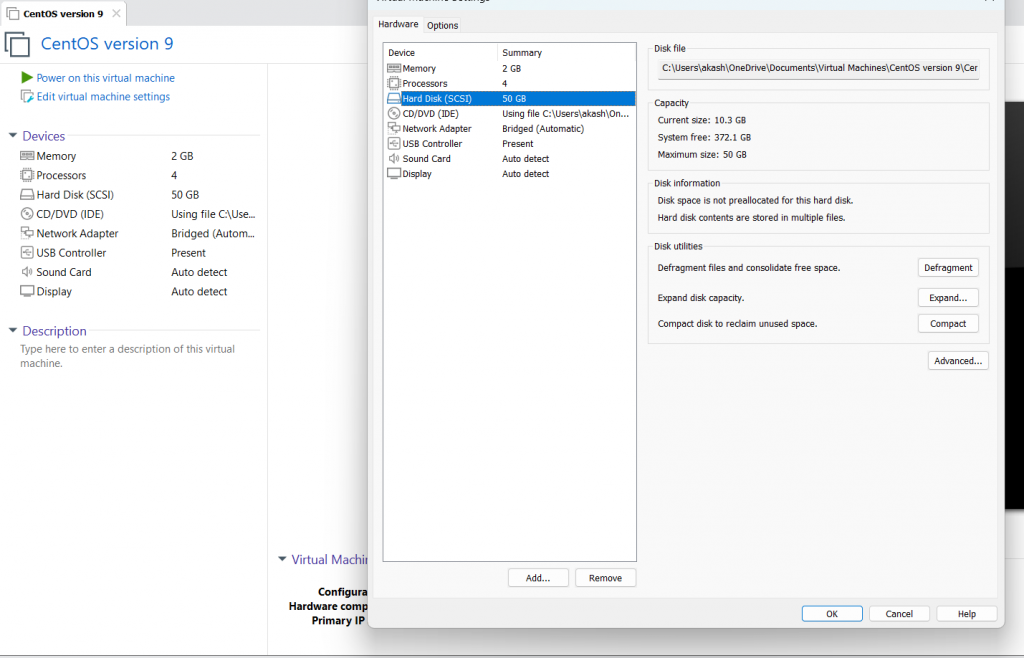
We will click on Add from bottom side.
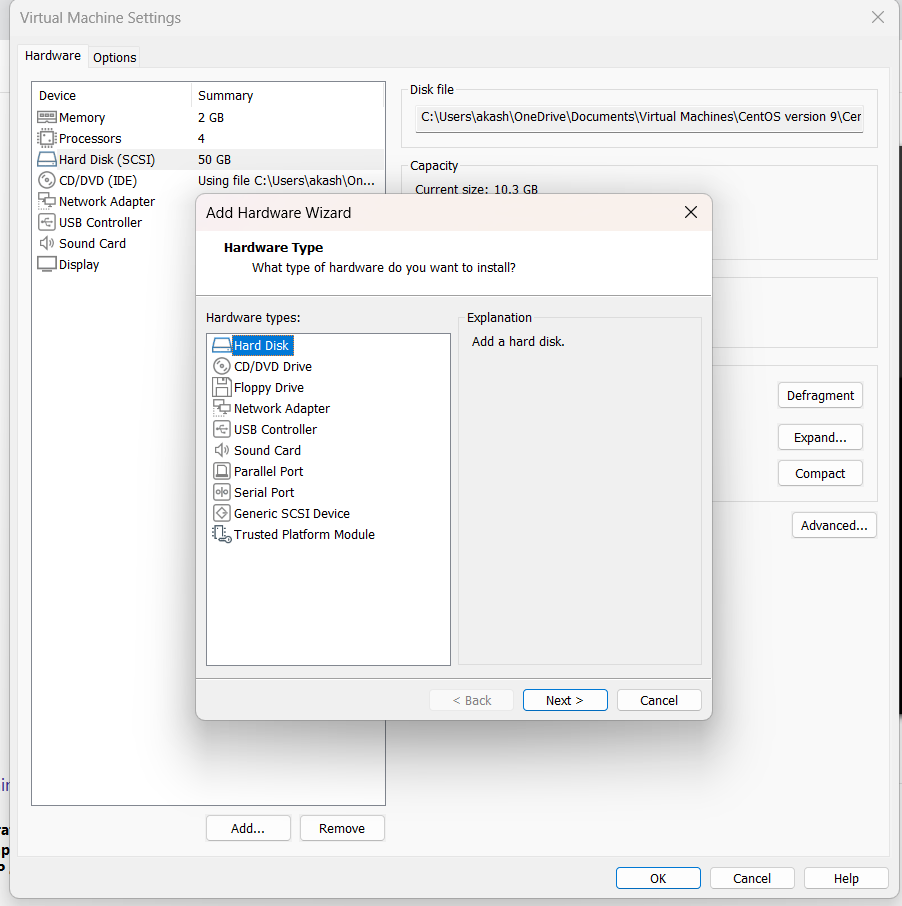
We will click on Next with the default hard disk option already selected in hardware types.
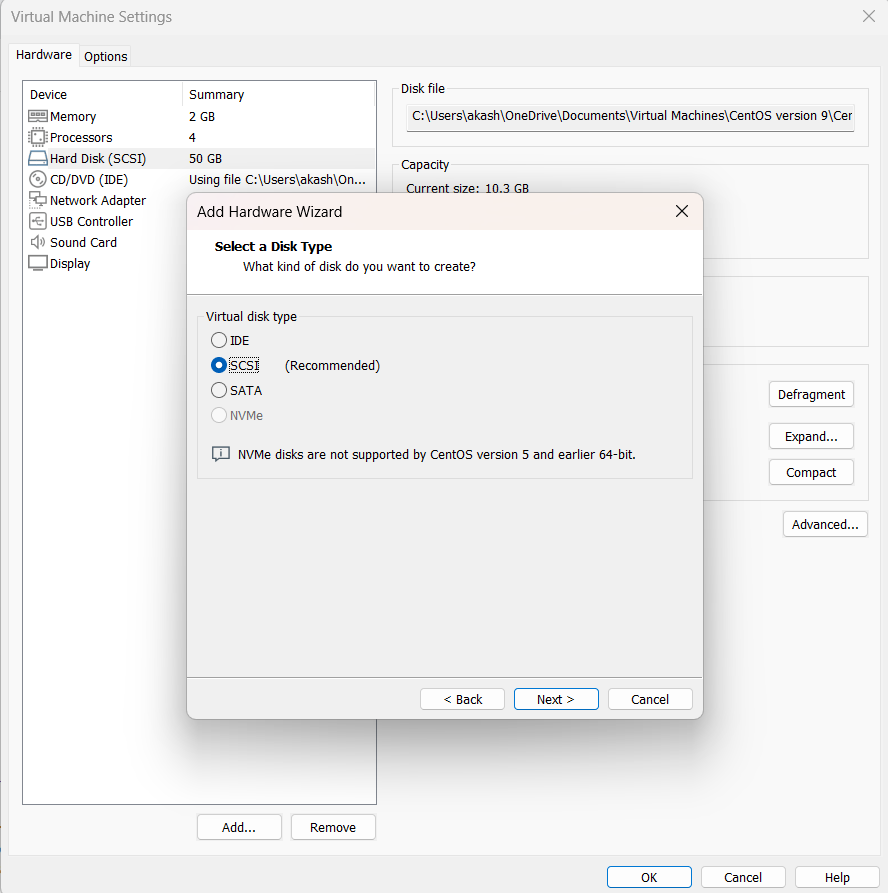
We will click on Next with the default SCSI option already selected in virtual disk type.
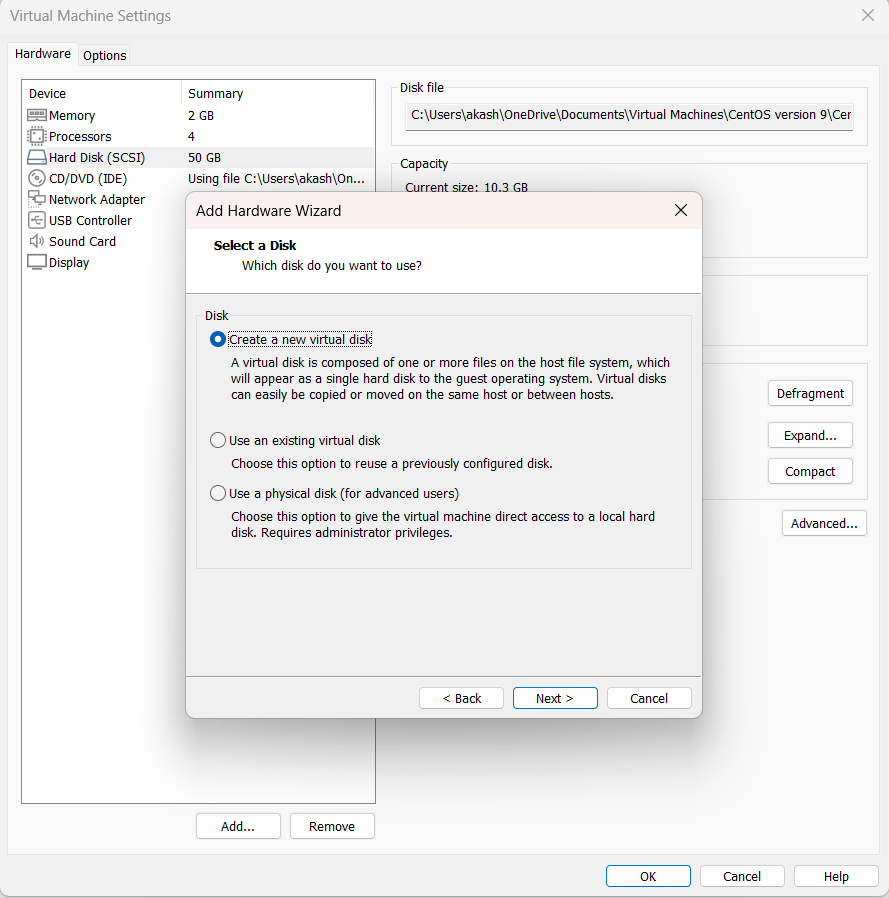
We will click on Next with the default create a new virtual disk option already selected.
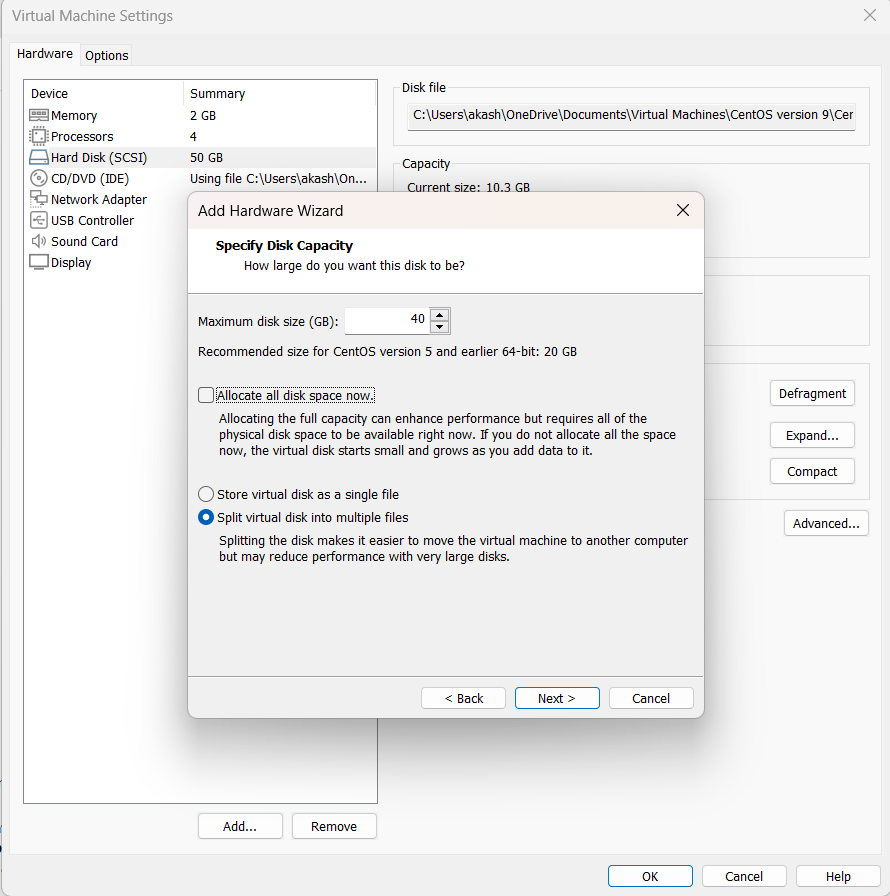
Now, We have to write 40 in “Maximum disk size” and click on Next.
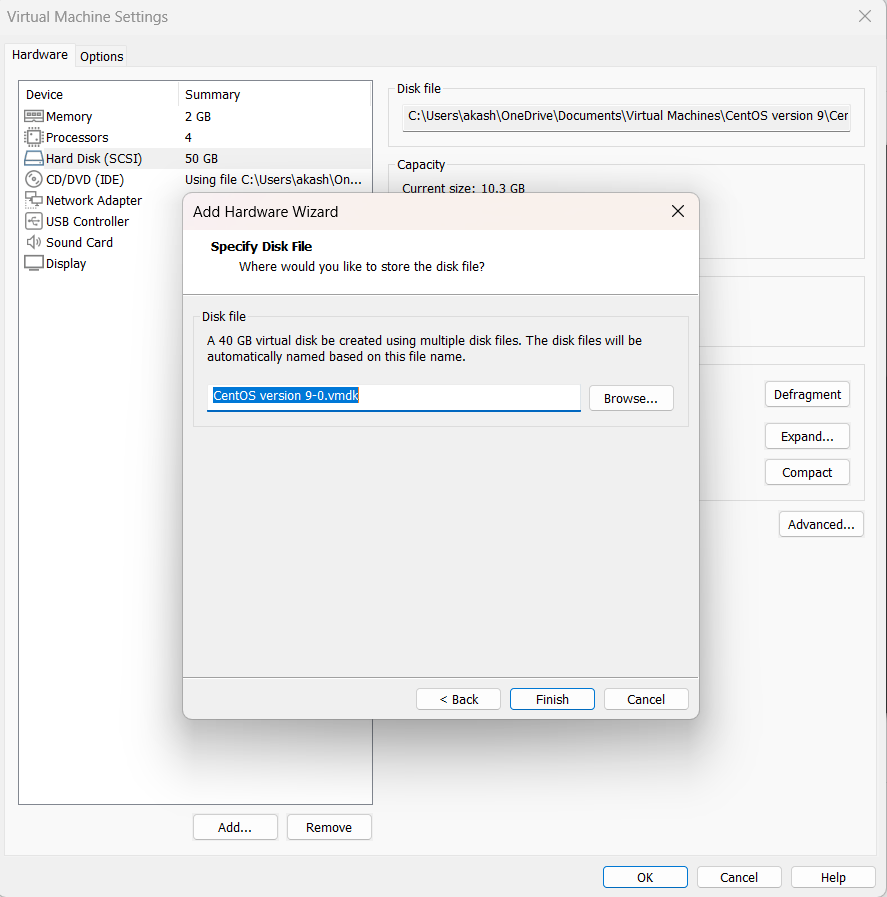
We have to click on Finish and start our virtual machine again.
Now we will check our new storage by “fdisk -l” command.
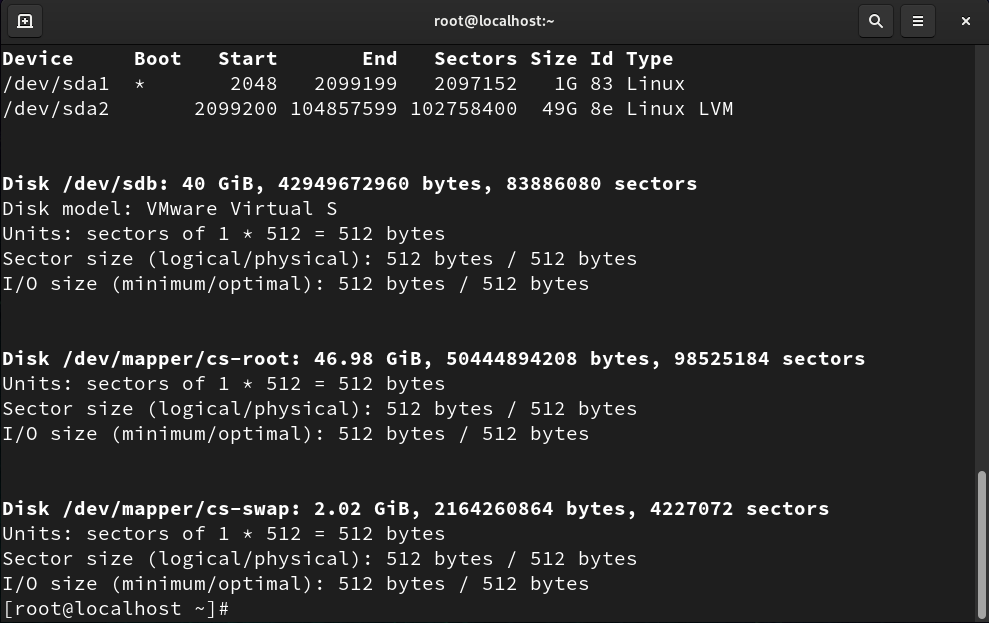
We can see “/dev/sdb” of 40 GiB is added now.
We can start our first partition in Linux.
For starting we have to use fdisk command again with our new disk name i.e, /dev/sdb for entering inside the disk. So, The command would be “fdisk /dev/sdb“.
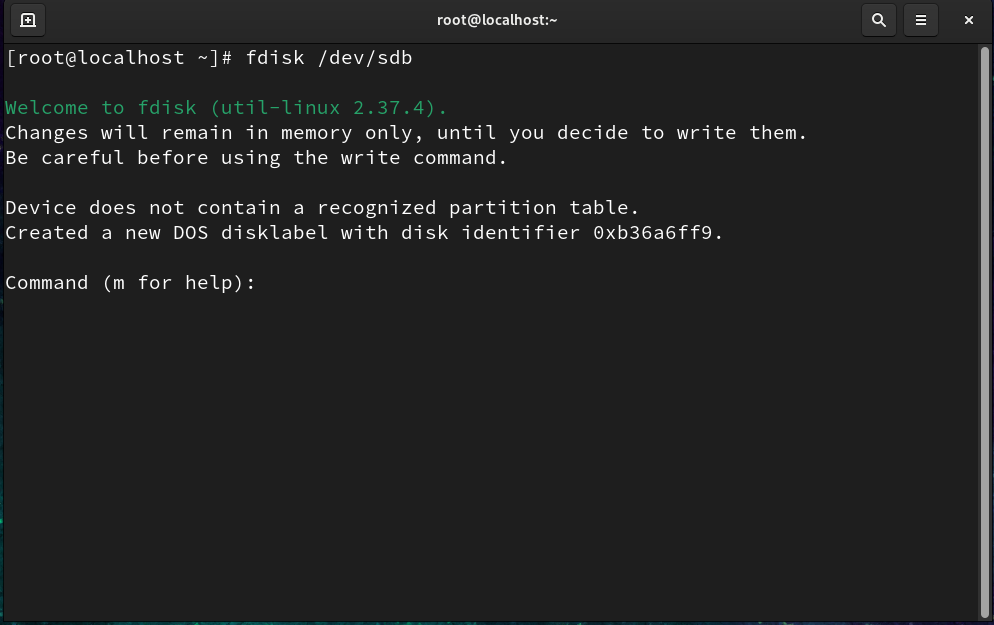
We are inside our new /dev/sdb disk now and we can check all the options by pressing m for help.
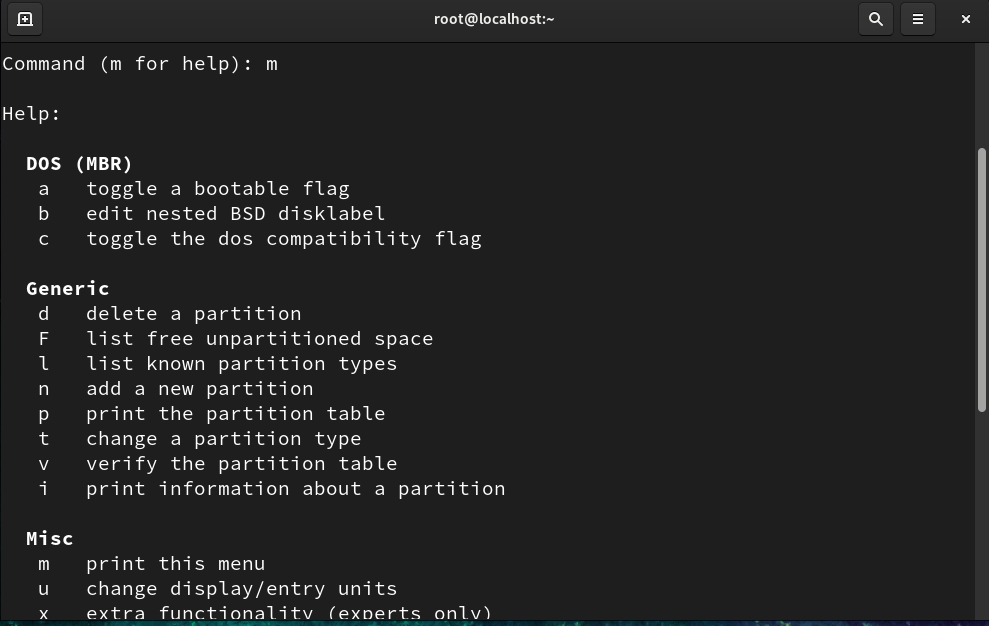
As we can see we have to press n for adding the new partition in /dev/sdb disk.
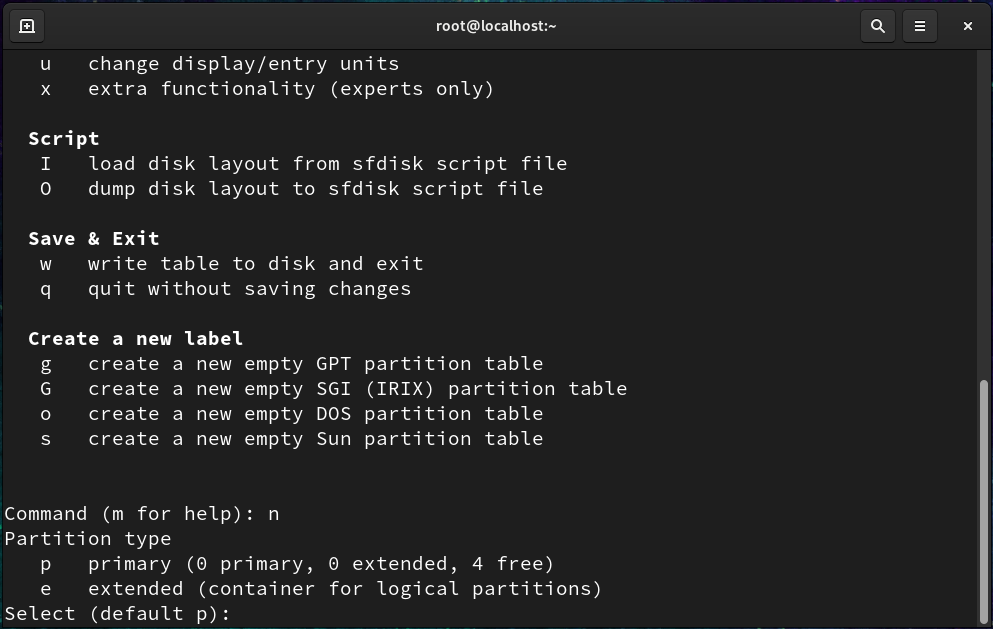
After pressing n, We will get 2 options with the key p as primary and e as extended. We will go for p as we have to make our primary partition and e is an option when we cannot make more partitions that we will see later. Also, p is showing as default option from the system side.

Now we can see, It is asking for the partition number from 1-4 and default comes as 1. As we are making our first partition we will choose 1. As 1 is also the default option, We can just press enter or type 1.

It is the time to give the size of the first partition as Linux systems default understanding of the storage size comes as sectors so it will ask us to give in sectors. Till 2047 sectors it use to store the information of partition table so we cannot use that.
We will select the default option as 2048 for our starting storage sector.
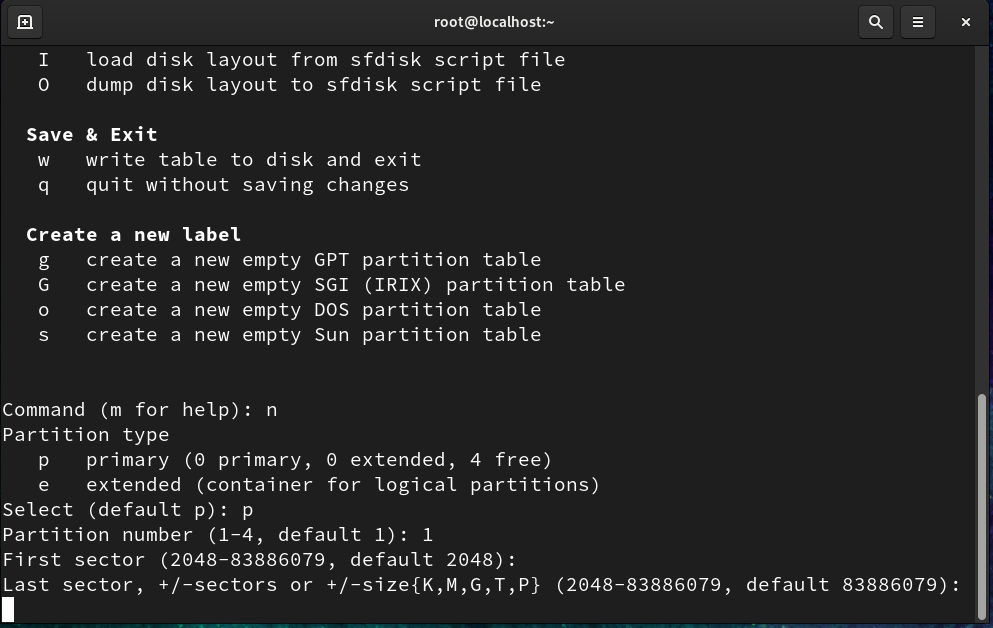
Next, We have to provide the size in sectors or in K(KB), M(MB), G(GB), T(TB) and P(PB) with +/-. By default it will take till last sector of your hard disk.
We will make our first partition of +10G that is having 10 GB. Type +10G and press enter.
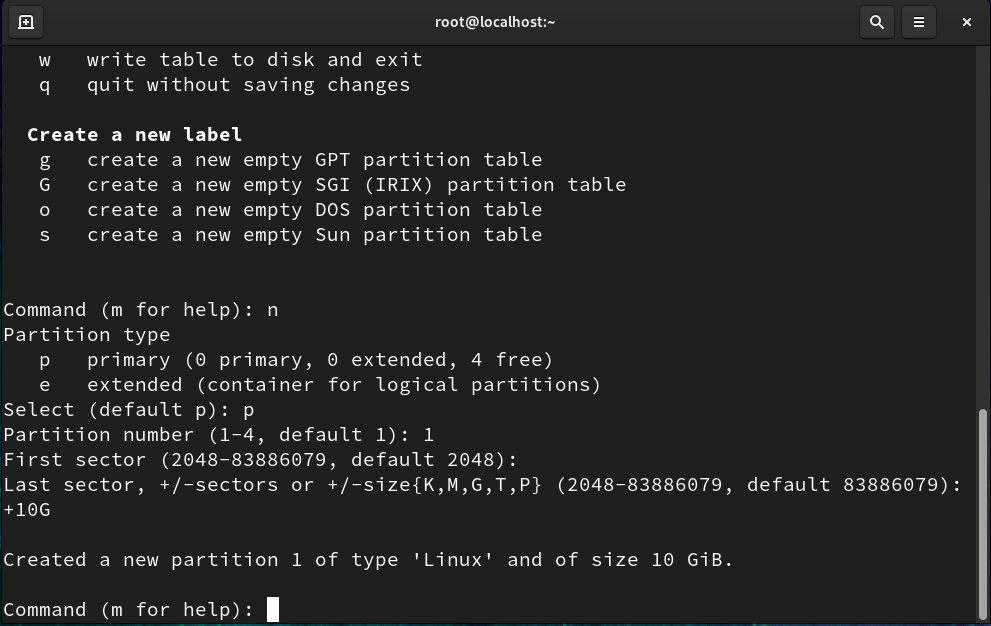
Now our first partition has been created of type ‘Linux’ and of size 10 GiB. We can change our type also that we will see later.
To know the partitions in the hard disk, We have to press p for that.
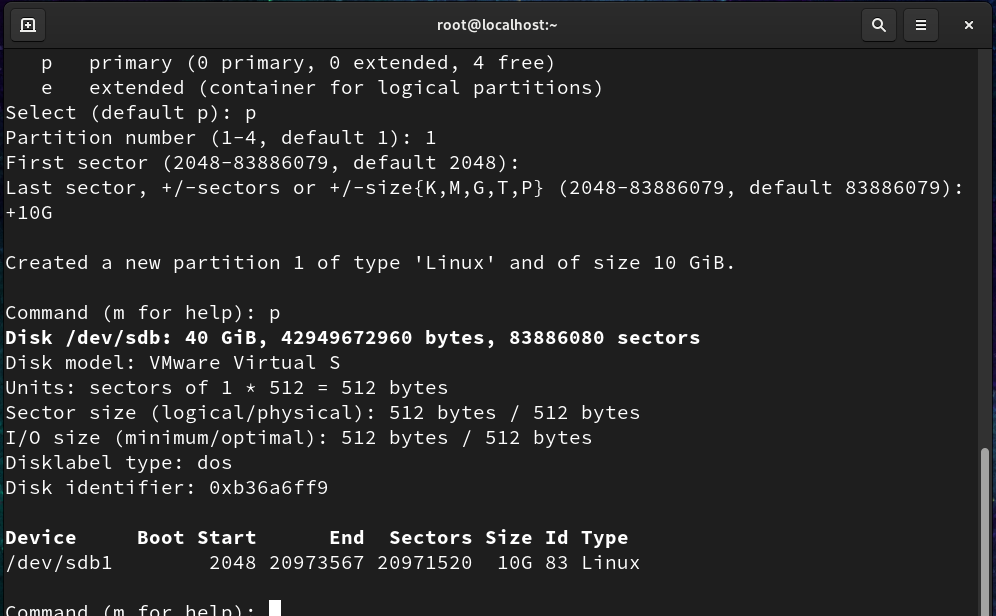
Now, We can see there is one partition named “/dev/sdb1” of 10G is showing under “/dev/sdb” hard disk of 40 GiB.
We can make only 4 primary partition in Linux. If we have remaining space left that is not utilized then we can make extended partition in Linux
Now, We will make 4 primary partition in total. First we have already made of 10 GiB. Second, Third and Fourth would be of 5 GiB each.
Let’s Begin in making more partition in Linux that would be /dev/sdb2, /dev/sdb3 and /dev/sdb3 respectively.
Let’s start with our Second partition in Linux.
We have to press n for adding the new second partition in /dev/sdb disk.
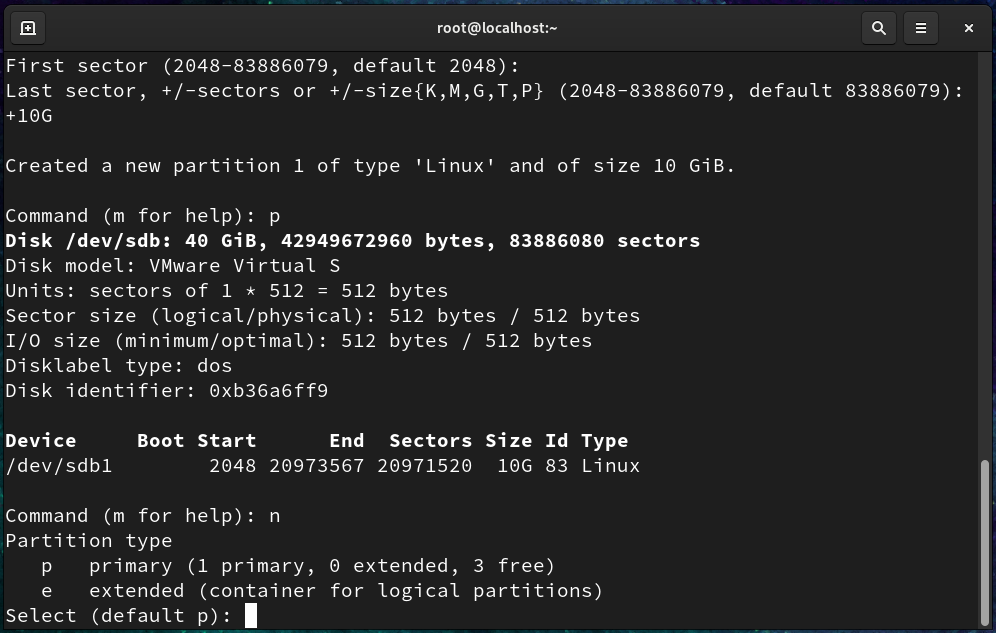
We will press p for the default option as primary partition.
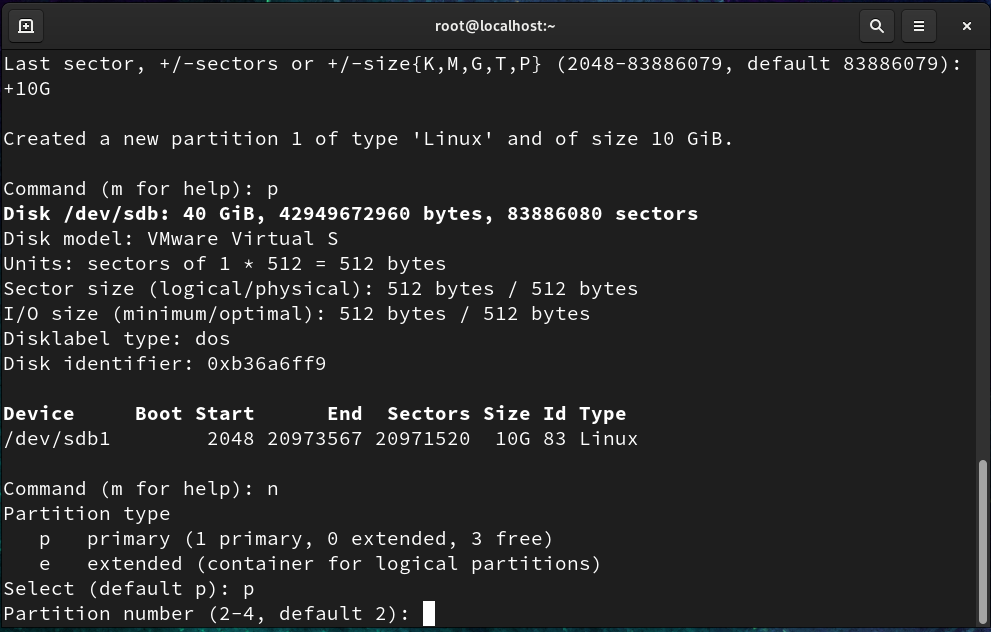
We will choose default partition number 2 by pressing enter key as it is our second partition.
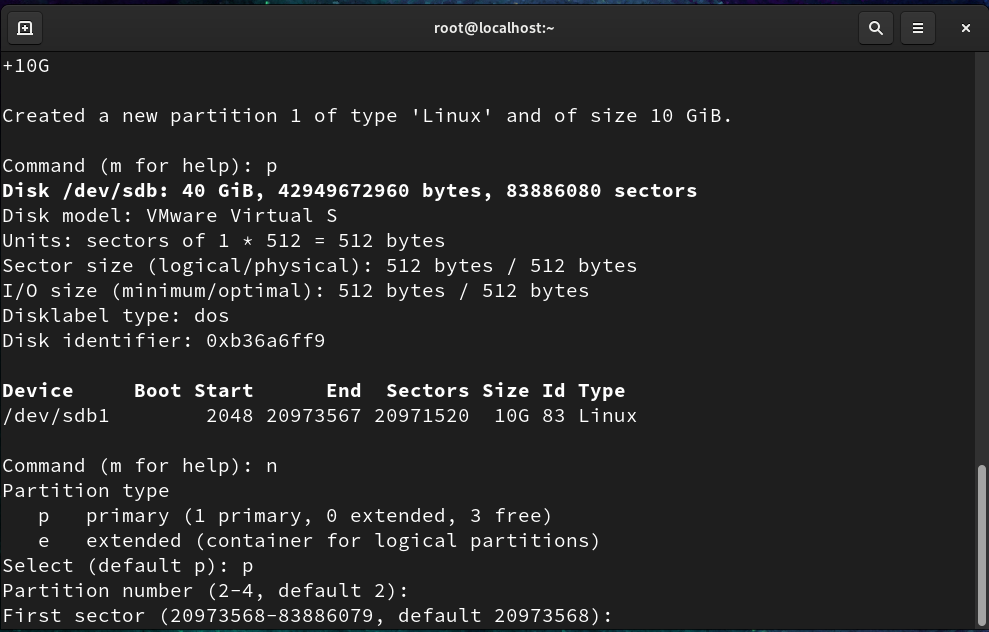
For the first sector, We will select the default sector by pressing enter key as it is the starting sector.
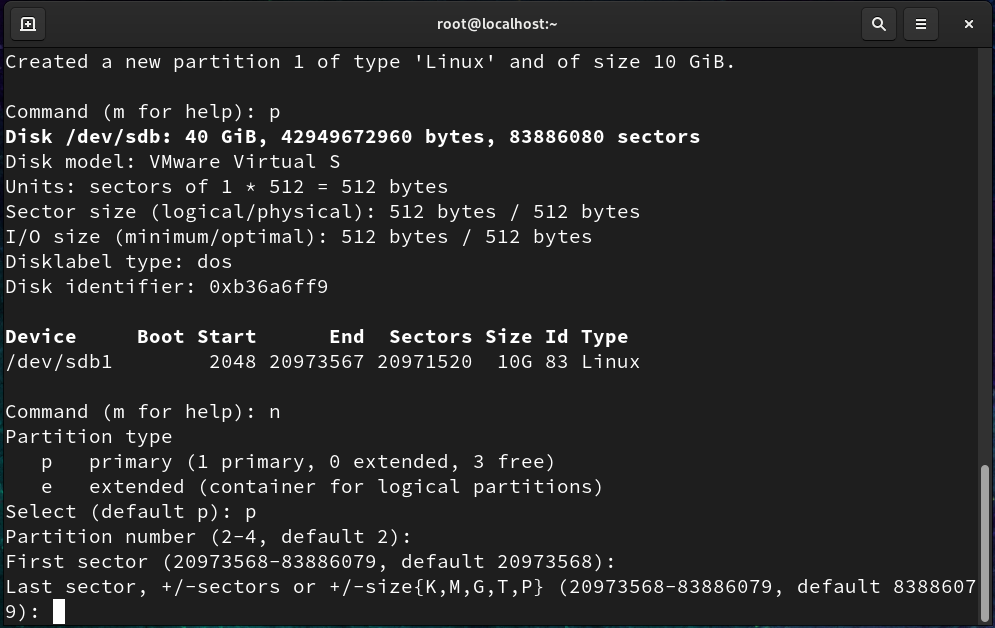
Now, We have to provide the size for the partition that would be 5 GB. Type +5G for the second partition.
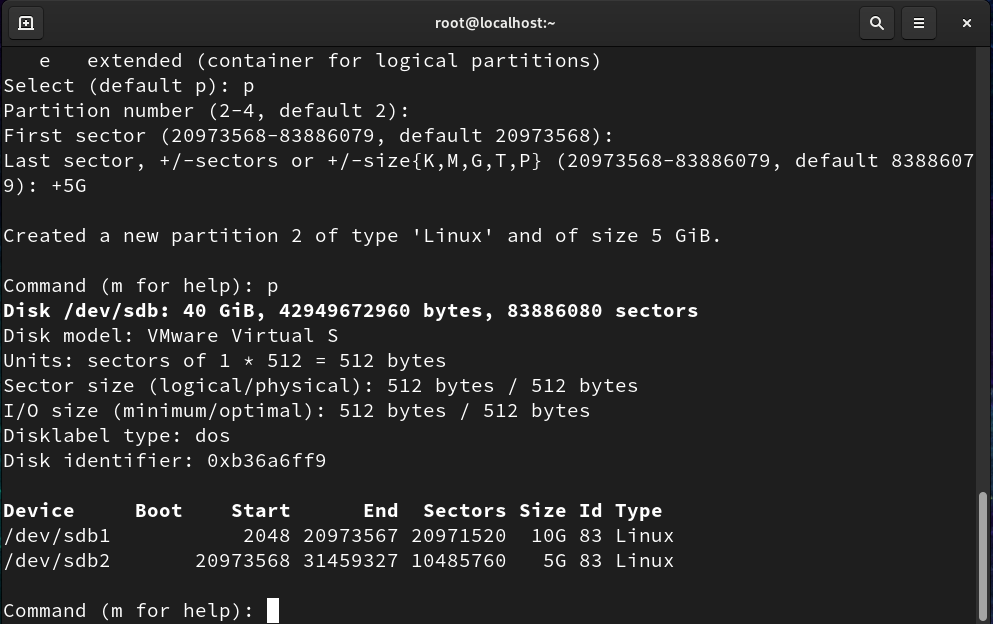
Our second partition is created of size 5 GB. We have checked by pressing p and /dev/sdb2 of 5G partition is showing under /dev/sdb hard disk.
Let’s start with our third partition in Linux.
Again, We have to press n for adding the new third partition in /dev/sdb disk.
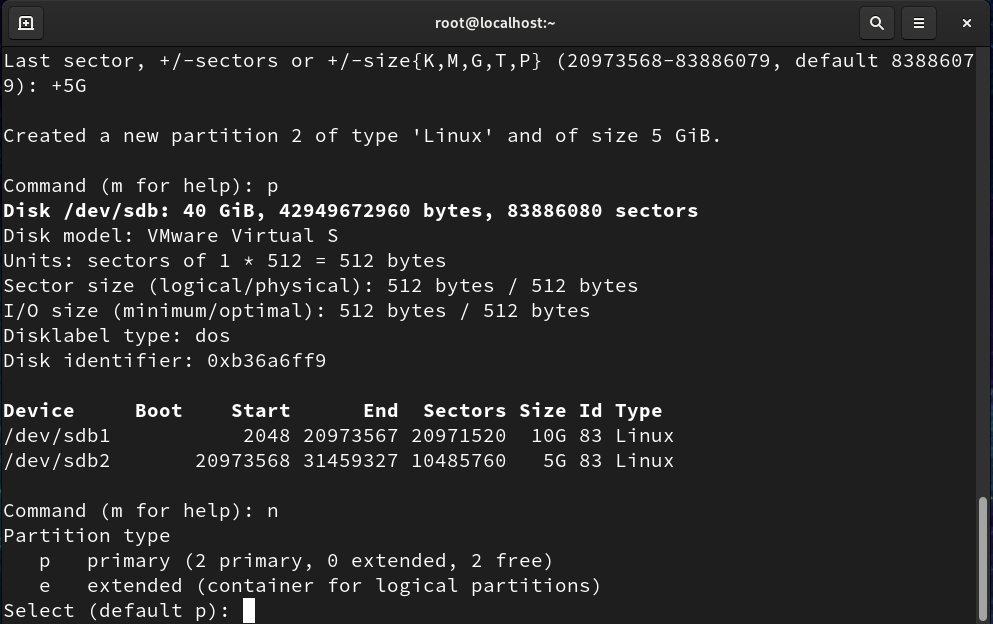
We will press p for the default option as primary partition again.
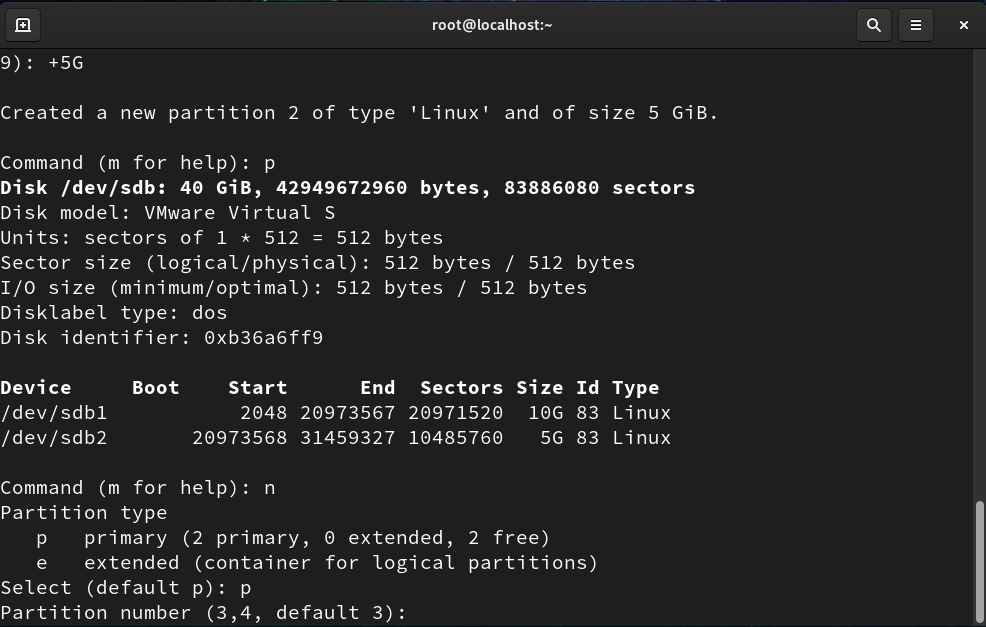
We will choose default partition number 3 by pressing enter key as it is our third partition.
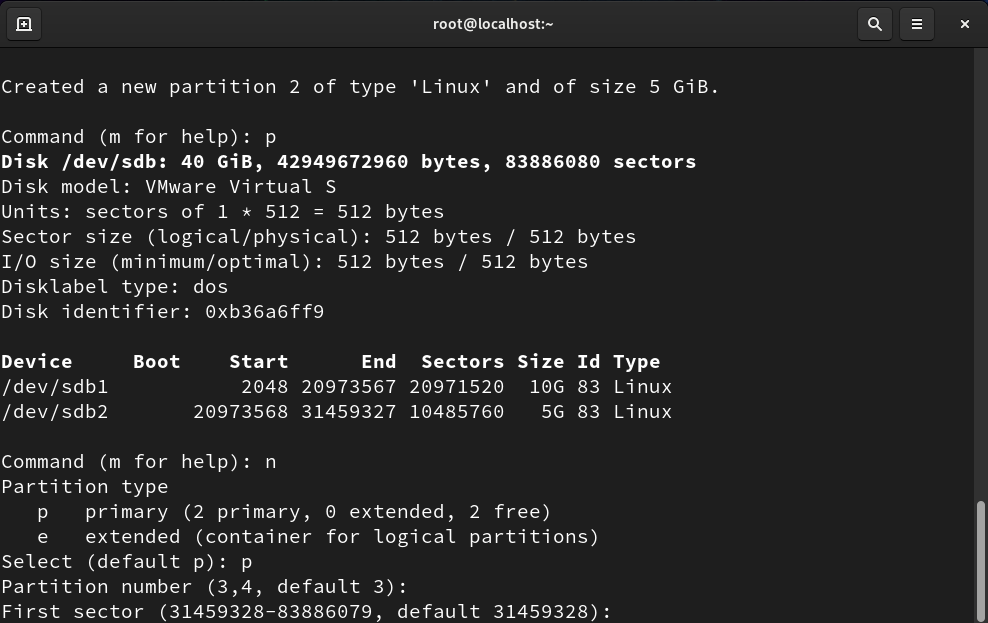
Now for the first sector, We will select the default sector by pressing enter key as it is the starting sector of our partition.
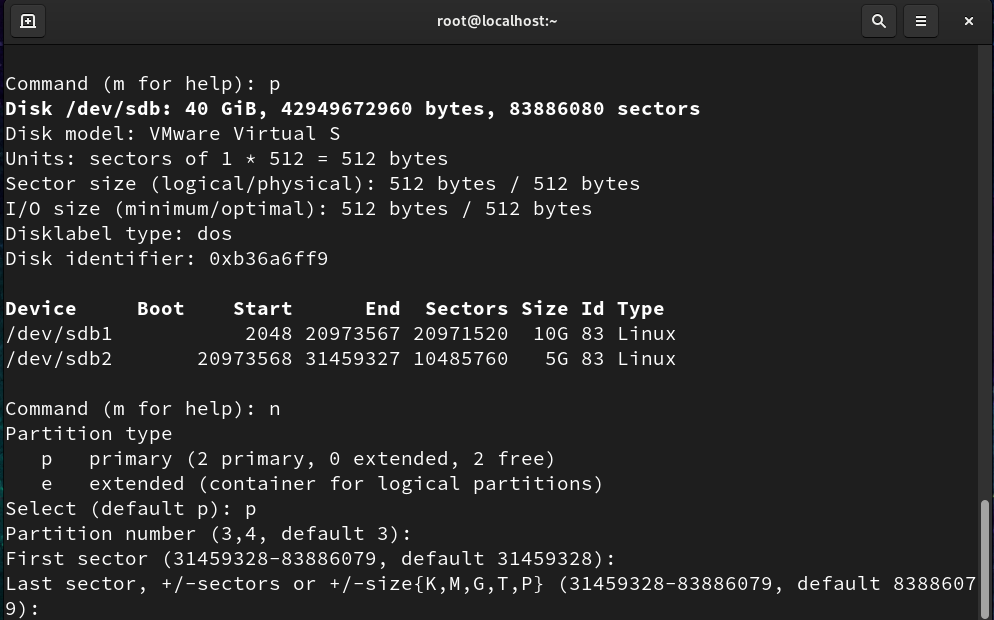
Next, We have to provide the size for the partition that would be 5 GB. Type +5G for the third partition.
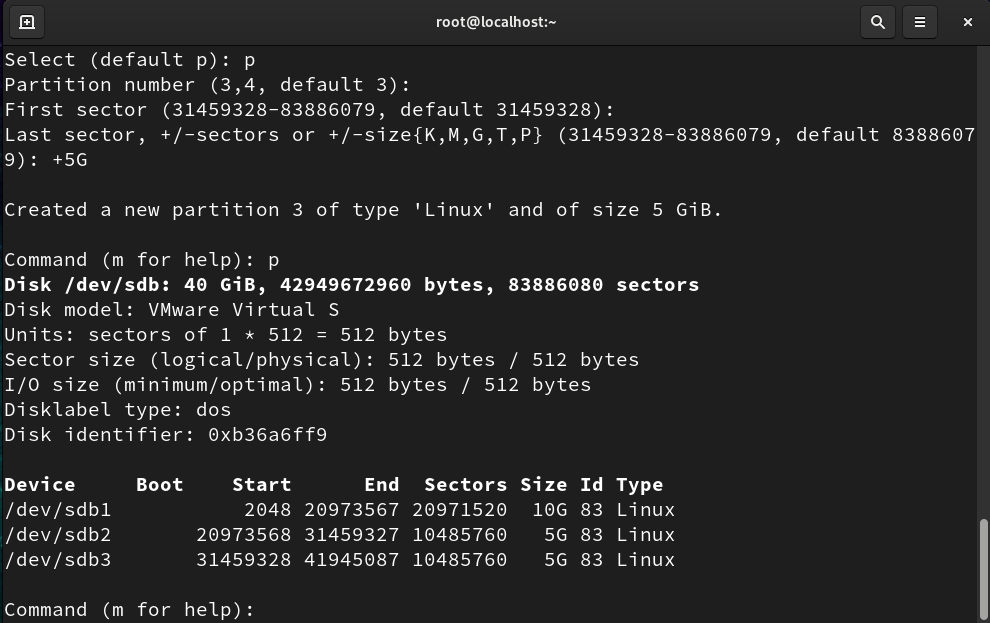
Our third partition is created of size 5 GB. We have checked by pressing p and /dev/sdb3 of 5G partition is showing under /dev/sdb hard disk.
Let’s start with our fourth partition in Linux.
We have to press n for adding the new fourth partition in /dev/sdb disk.
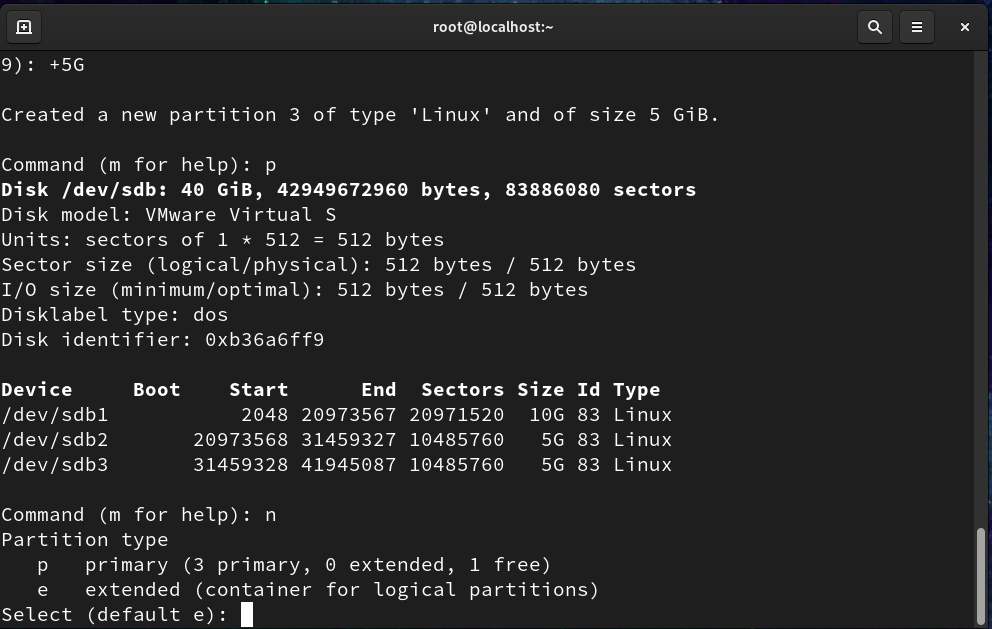
As you can see, Every time we are choosing the default p option but this time it is showing e as a default. We will type p and press enter key.
For extended partition, We will explain in our another post.
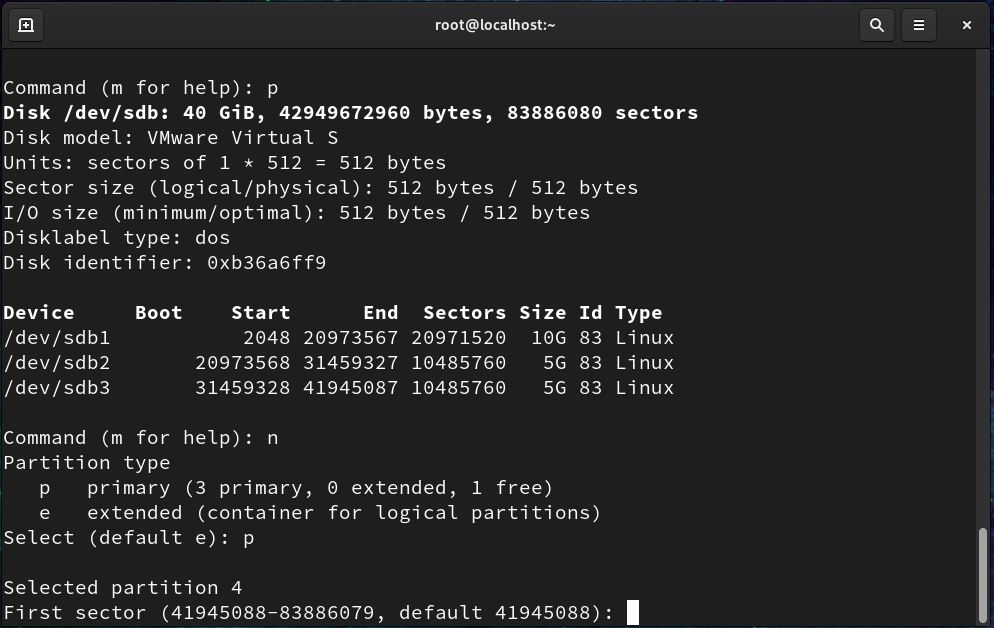
For the first sector, We will select the default sector by pressing enter key as it is the starting sector for this partition.
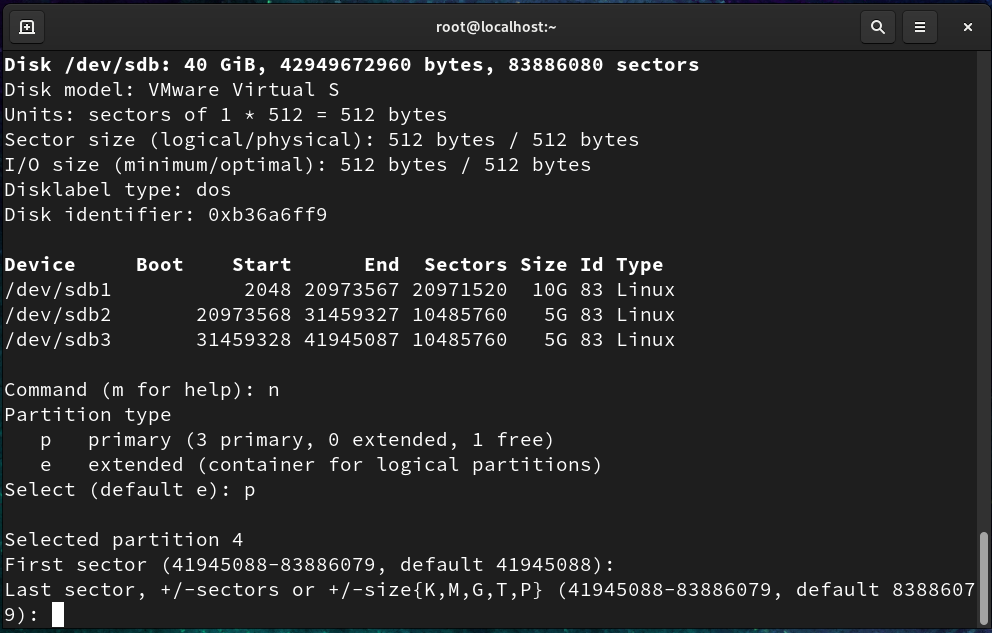
Next, We have to provide the size for the partition that would be 5 GB. Type +5G for the fourth partition.
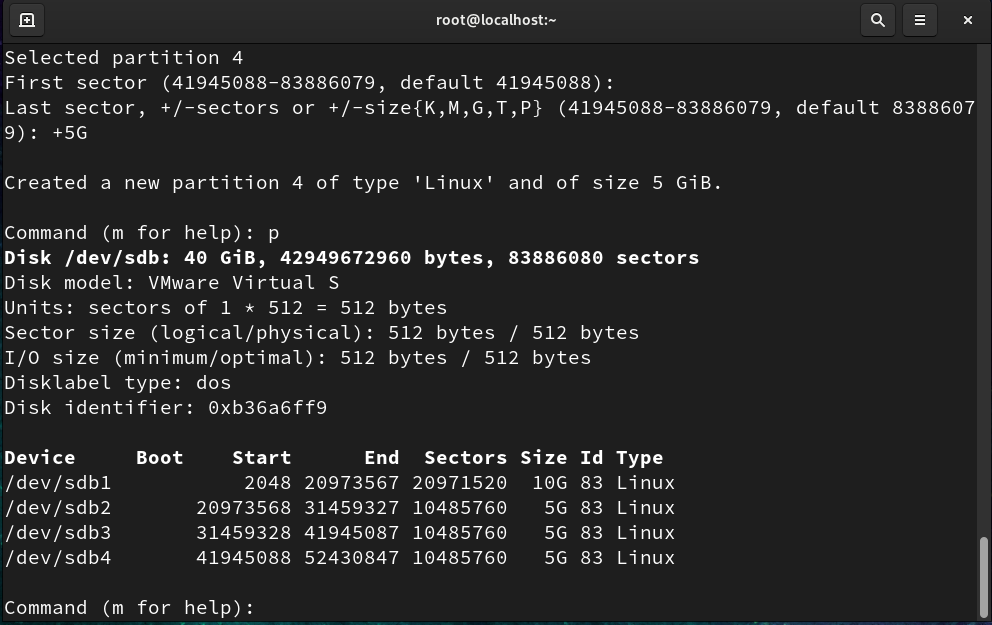
Our fourth partition is created of size 5 GB. We have checked by pressing p and /dev/sdb4 of 5G partition is showing under /dev/sdb hard disk.
We cannot create more primary partition in Linux. For creating more partition in Linux if in case we have unutilized space in our hard disk, We have to make our fourth partition as an extended partition. We will surely learn about this in our upcoming post.
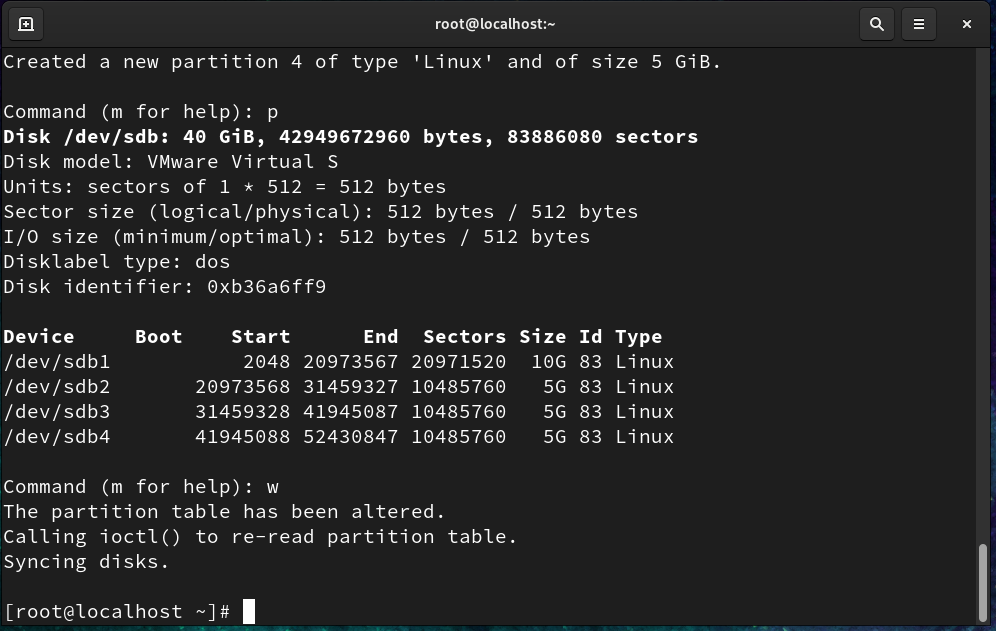
Next, We have to save our partitions and exit from making the partitions as we have reached our limit of 4 partitions.
We have to press w for saving the partitions.
We can check the detailed information about our hard disk named /dev/sdb by ‘lsblk‘ command.
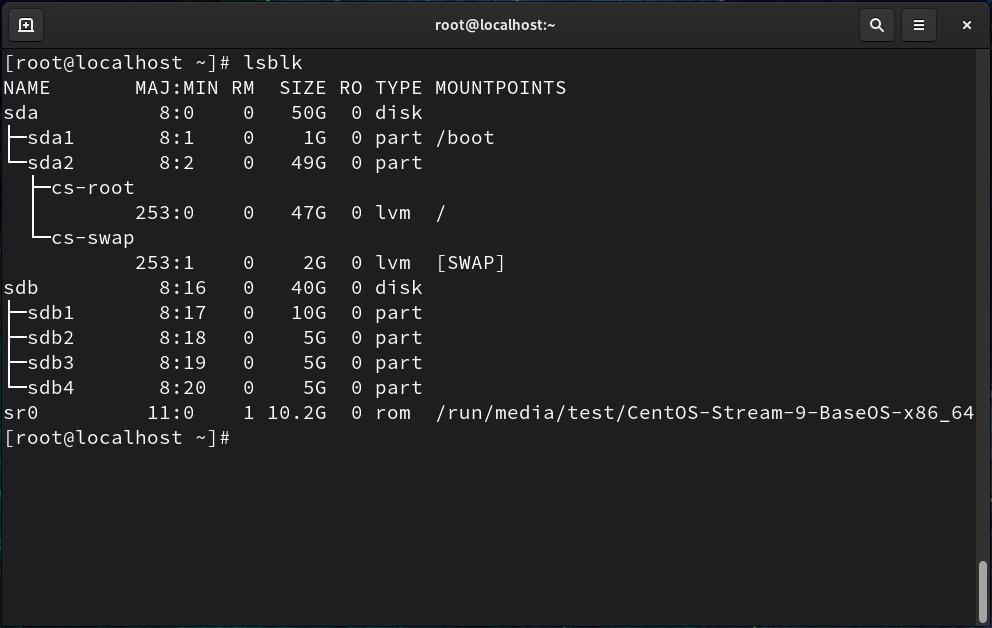
Now, Our hard disk /dev/sdb with partitions named /dev/sdb1, /dev/sdb2, /dev/sd3 and /dev/sdb4 are created but not ready to use.
We have to settle, format and mount the partitions in Linux.
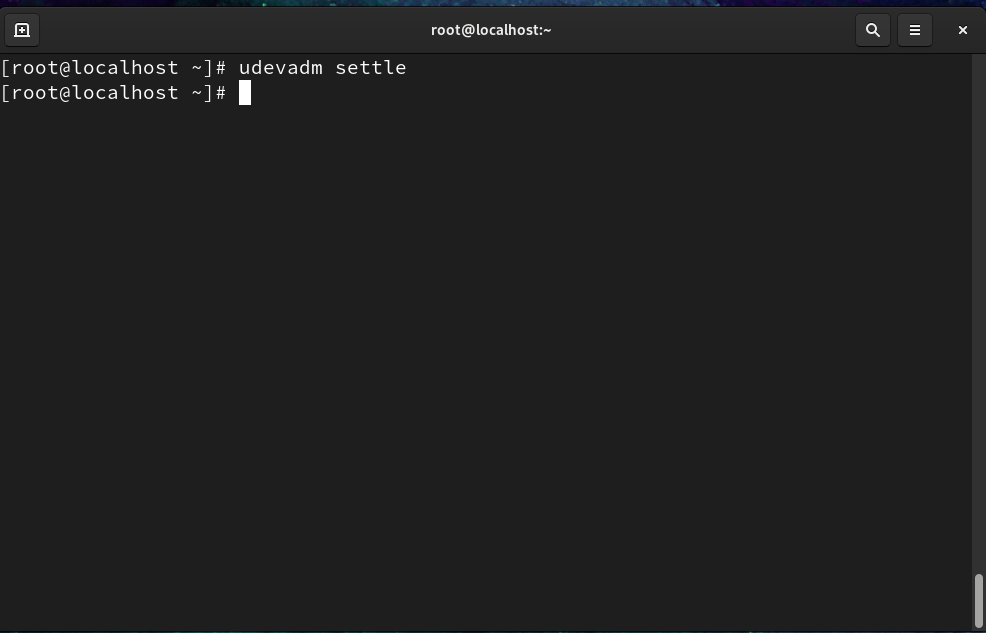
We will use ‘udevadm settle‘ command. It is a general command use to settle the changes in devices like adding or removing a device before continuing further.
Next, We have to format the partition to get all the space that we have created in our /dev/sdb hard disk.
The two well known formatting types in Linux are ext4 and xfs. We will use ext4 as it supports more options to perform later.
So, The command for formatting the partition is “mkfs.ext4 /dev/sdb1 (partition name)“.
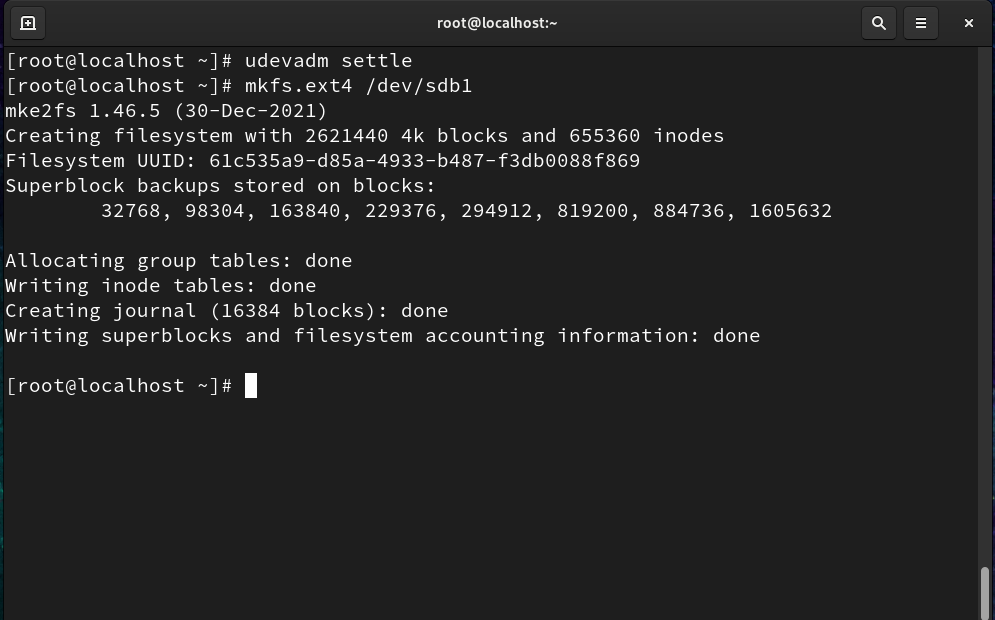
Our formatting for first partition i.e, /dev/sdb1 is done and you can do the formatting of all the four partitions like this.
Next, We will mount the partition to a directory to use it as every thing in Linux we store in a file inside a directory.
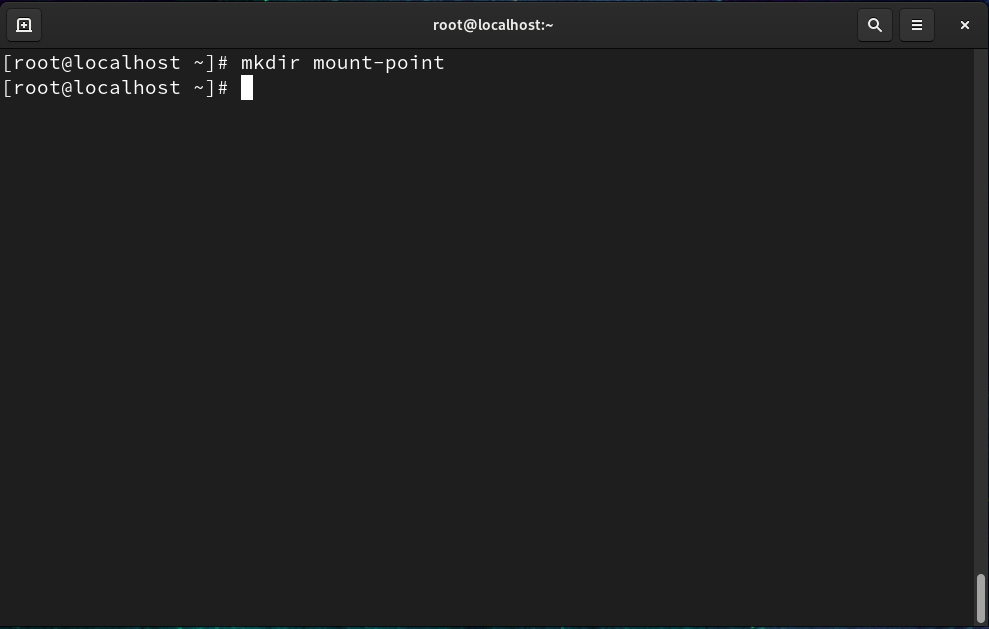
We will make one directory name ‘mount-point‘ with the help of ‘mkdir‘ command.
The command would be “mkdir mount-point“.
To mount our partition, We will use mount command i.e, “mount /dev/sdb1 mount-point“.
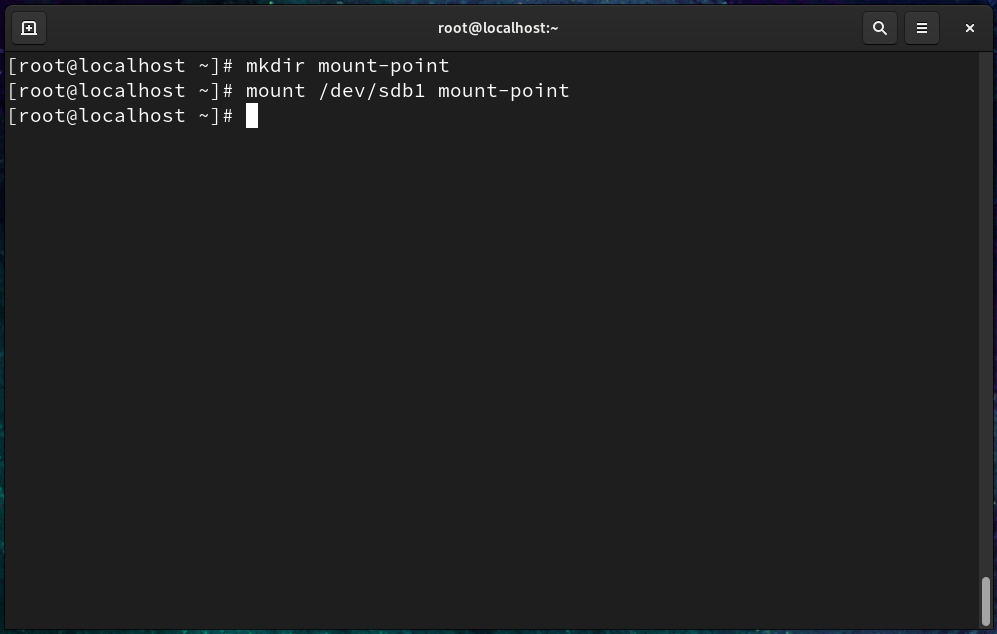
Now, We can see our first partition to be active and it is ready to use for storing things.
We can check our new partition by ‘df -h‘ command.
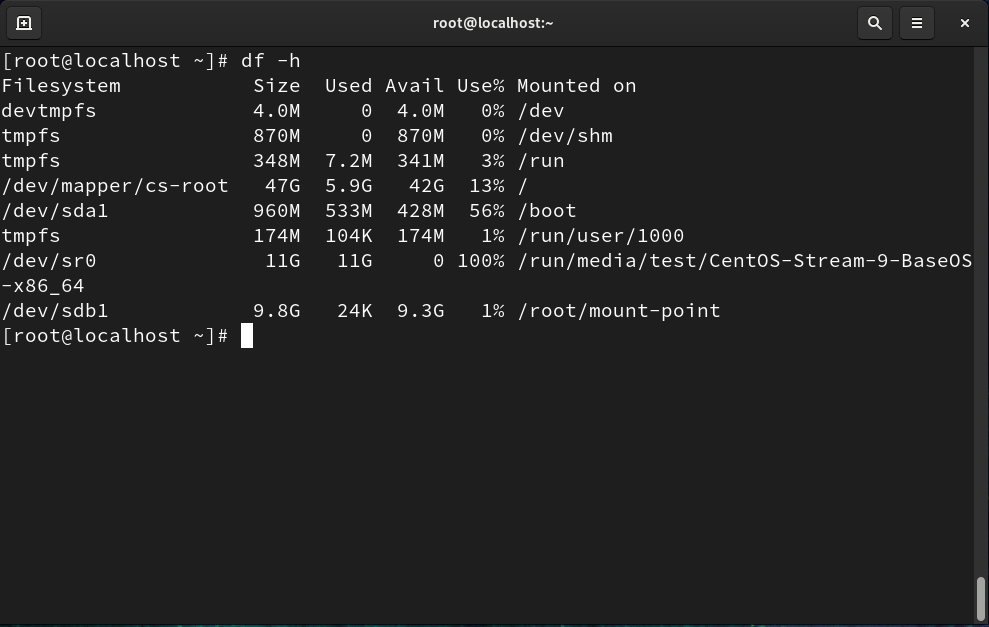
Finally, We can see our partition to be available for use. Last step is to make our partition /dev/sdb1 permanent.
We have to store the partition details in /etc/fstab file for that.
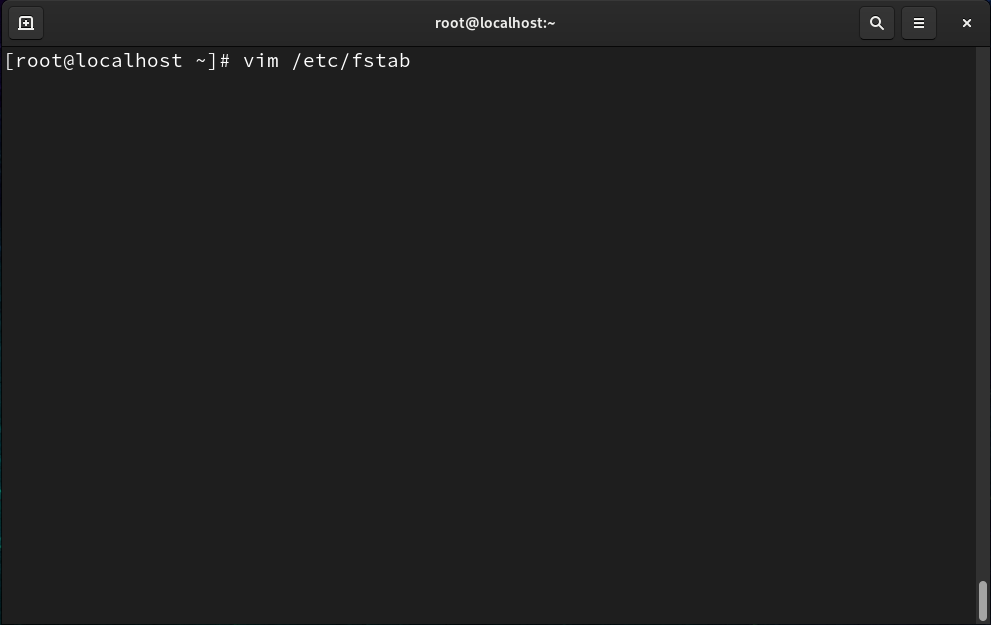
We have to add device name, mount point name, format type, options, disk check and disc sync in the /etc/fstab file.
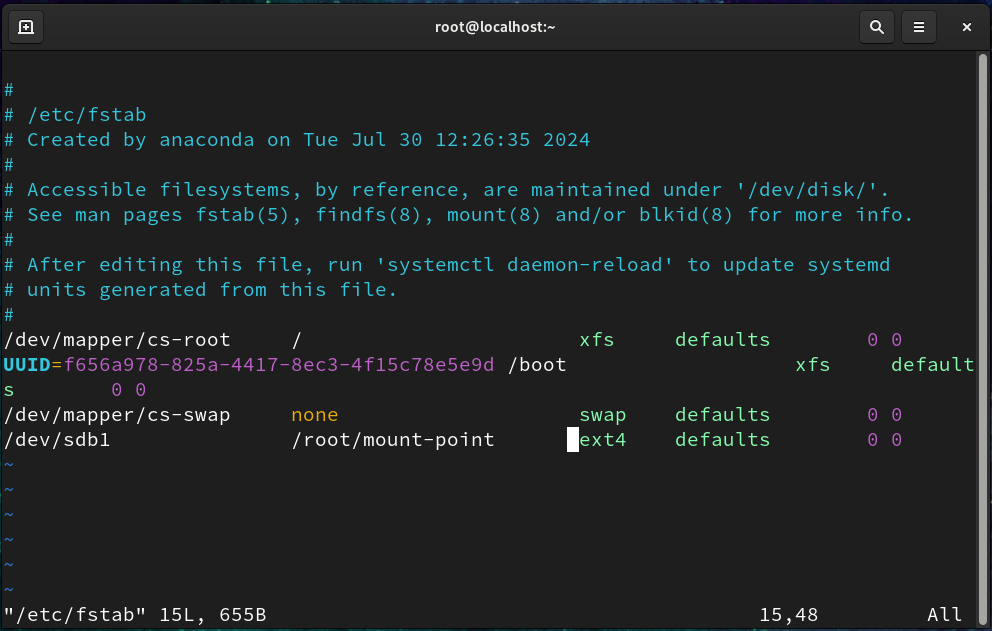
We have to save file and quit the file by ‘:wq’ option.
That’s all for ‘how to create partition in linux’.
FAQ on partition in linux
Q. What is the difference between primary, extended, and logical partitions?
A. Primary Partition: A basic partition that can be used to store a file system or OS. You can have up to four primary partitions on a disk.
Extended Partition: A container for logical partitions, used to bypass the four-partition limit of primary partitions. You can create only one extended partition per disk.
Logical Partition: A sub-partition inside an extended partition. You can create many logical partitions within a single extended partition.
Q. How do I list all partitions on my Linux system?
A. To view the partitions on your system, you can use the following commands:
lsblk – Lists all block devices and their partitions.
fdisk -l – Lists the partitions on all disks.
blkid – Displays information about block devices, including partition types and UUIDs.
Q. What is the swap partition, and do I need one?
A. A swap partition (or swap file) is used as virtual memory when the physical RAM is full. Linux moves inactive data from RAM to swap space to free up memory for active processes. While not mandatory, having swap space is recommended, especially for systems with limited RAM. The size of swap is typically 1-2 times the amount of RAM, but it depends on your usage needs.
Q. What is the difference between ext4, ext3, and other file systems?
A. ext4 is the most common file system for Linux. It supports large files and partitions, has journaling capabilities for better data integrity, and is faster than ext3.
ext3 is an older file system that also supports journaling but lacks some of the performance improvements and features of ext4.
XFS is a high-performance file system that is often used for large-scale applications and enterprise environments.
Q. What should I do if I accidentally format or delete a partition?
A. If you accidentally format or delete a partition, you can try data recovery tools such as TestDisk or Photorec to recover lost partitions or files. However, the success of recovery depends on how much data has been overwritten on the disk.
Discover more from Root Learning
Subscribe to get the latest posts sent to your email.


I have learnt partitions from you, It is not that easy before.
Thanks mate 👍🏻
Easy way to remember!!!
I am extremely impressed with your writing abilities as neatly as with the format for your
weblog. Is that this a paid theme or did you customize it yourself?
Anyway keep up the nice quality writing, it’s rare to peer a nice blog like this one nowadays.
Bhai gazab ki post likhi hai yar 👆🏻👆🏻
Good one
You make partitioning so easy to do!
Partitioning is the one of the difficult task to do but after your post I can just copy 🤣🤣🤣